Posts tagged Rimmel

Fragrance Direct Valentine’s Look: English Rose

8

The lovely folks at Fragrance Direct recently set me a fun challenge – to create a look for Valentine’s Day using make up from their site.  I was given a budget of £20.00, and could choose five items in total.  I initially planned to go for smokey eyes and vampy red lips, but as that’s quite a clichéd Valentine’s look, I went for something a bit different in the end.  I wanted to keep it simple, so I settled for a fresh-faced ‘English Rose’ look that makes the most of my pale skin, with pretty pink cheeks, lips and nails.  After all, roses are what Valentine’s is all about, right?  These are the five items that I chose…

OLYMPUS DIGITAL CAMERA

Rimmel Stay Matte Foundation in ‘Light Porcelain’ £5.50 / Rimmel ScandalEyes Thick Eyeliner in ‘Black’ £5.00 / Bourjois 10 Day Anti Choc No Chips Nail Polish in ‘Shade 26′ £1.99 / Maybelline Clear Smooth Blush in ‘Fresh Rose’ £2.50 / Calvin Klein Delicious Luxury Creme Lipstick in ‘Mesmerize’ £1.99

Total: £16.98

On the high street, these products would have cost over £35.00 in total, so to get everything for under £20.00 is a massive bargain!

As was allowed, I used a few bits and pieces from my make up bag to complete the look (namely concealer, face powder, a bit of kohl eyeliner and mascara), and here is my finished look…

OLYMPUS DIGITAL CAMERA

OLYMPUS DIGITAL CAMERA

I must say, I am really impressed with the staying power of all of these products.  The lipstick stayed put through a meal and several drinks, the eyeliner didn’t budge at all until I removed it, the foundation gives amazing coverage which lasts all day, as does the blusher, and the nail polish is supposed to stay chip-free for 10 days!

I’m happy with my Fragrance Direct Valentine’s Look – it’s subtle, but still pretty, and I think it’d be perfect for a relaxed Valentine’s Day lunch.  You can check out Fragrance Direct’s full range of cosmetics here.

Naomi x

*These make up items were sent to me by Fragrance Direct.  All opinions expressed are honest and my own.*

NOTD: Rimmel 60 Seconds in ‘Blue My Mind’

7

Earlier this week I received a lovely little package in the post from RaRa Reid.  I was lucky enough to win her first giveaway and the prize was a pink nail art pen, a set of nail wraps and this nail varnish – Rimmel 60 Seconds in shade ‘810 Blue My Mind’.  Thanks Ra!

I have always rather liked Rimmel’s range of 60 Seconds nail varnishes as they tick so many boxes, and ‘Blue My Mind’ is no exception.  As you can see from the sticker on the lid, the varnish has an ‘Xpress Brush’, which is wide so covers each nail completely with the right amount of pressure.  Though it takes more than ‘1 Sec’ to achieve even coverage, the wide brush means application is very quick and takes very few strokes of the brush.  It only takes two coats of the varnish for fully opaque coverage as well, which in my eyes is all it should take – any more is too many!

As you would expect, the varnish dries in ’60 Seconds’.  I only had to leave a minute between applying each coat, so by the time I had painted the nails on both hands, the first hand was ready straight away for its second coat.  As such, the whole mani took less than five minutes which is extremely speedy!  Perfect for a quick fix before an impromptu night out, or even before leaving for work of a morning.

The coverage in the photo above may look slightly blotchy, and though I was left with some fabric imprints in the top coat when I woke up, most of the ‘blotchiness’ is actually just reflections of the clouds and trees!  That’s just how shiny the finish of this varnish is.

‘Blue My Mind’ is a really stunning shade of royal blue.  I’ve really taken to blue varnishes this year and this has to be the most beautiful blue that I own.  In unnatural light it looks very deep and almost black, but in natural sunlight the azure hues really pop, which reminds me a lot of the ocean on a sunny day.

The only thing that disappoints me about this varnish is that, after less than 24 hours, there are already signs of wear at the tips of my nails (which is visible in the photo above), but luckily there’s been no chipping.

Overall, another fine example of an excellent nail varnish from the Rimmel 60 Seconds range!

Naomi x

£100 Asos Blogger Challenge: Summer Gothic

8

To celebrate reaching (nearly) 1000 followers on Twitter, The Discount Coder Blog is running a giveaway, and to enter, you must complete the £100 Asos Blogger Challenge!  So, today, I will be sharing my entry :)  The rules of the challenge are as follows…

  • Head over to ASOS.com
  • Put together the hottest outfit you can for £100 or less (no student discount or Asos discount codes allowed)
  • Blog about your stylish ensemble over on your blog
  • Leave a comment below with a link to your post

I spent a good while over a couple of days browsing Asos for the ideal outfit for my entry.  I wanted to put together a fairly basic but daring outfit that I would wear myself and would be great for summer, and this is what I came up with: Summer Gothic!  The picture is clickable if you want to see it in more detail.


My starting point for this challenge was the main outfit.  I love dresses and I love black, so it seemed only natural to look for something along those lines.  I thought a sleeveless maxi was the way to go for a summer look, so when I saw this Maxi Dress with Dipped Hem I was sold.  Dipped hems are very trendy at the minute and I like the floaty look they give.  In my teenage Goth days I wore a lot of long flowy clothes so I think this is very suitable as a starting point for Summer Gothic!

My next choice was the shoes…  I was hoping to find a pair of big, black, stompy boots within my £100 budget but unfortunately that didn’t happen, so I went for my second choice – a pair of heeled TERI Platform Chelsea Show Boots to give the look a more elegant feel, whilst remaining edgy.  I mean, who doesn’t feel edgy in heels?  The platform makes them look quite chunky too which is what I was after.

Accessories wise I wanted to keep it simple but make a statement.  I thought skulls were ideal for the Gothic look, and when I came across the Skull and Floral Scarf I couldn’t believe how perfect it was!  I really, really want to buy it for myself – the print is stunning and it would add layers and depth to the simple dress.  I wanted something chunky but interesting for the wrists which is why I chose the River Island Bracelet Pack.  The skull detail matches the scarf really well and the different beads and materials add texture to the outfit.  The bracelets were in the men’s section of the Asos website, but who says women can’t wear ‘men’s’ clothes and accessories?

We all know an outfit isn’t complete without the right make up, so to match this simple Summer Gothic outfit, a simple Gothic make up look is needed.  Heavy make up in summer is a no-no, so I think classic red lips and nails, and smokey black eyes are all that’s needed!  Illamasqua’s branding screams classy and Gothic, which is why I chose Illamasqua SS12 Human Fundamentalism Lipstick in ‘Liable’, a beautiful bright red.  For strikingly bold, black eyes, Barry M Supersoft Eye Crayon is ideal, and to add an extra splash of colour I added Rimmel London I Love Lasting Finish Nail Polish in ‘Double Decker Red’ to the mix.

The total cost of this outfit is £98.49, so you’d even come away with enough change for an ice cream – the summery icing on the fashionable cake!

Naomi x

Nail Art Tutorial: Rainbow Stripes

16

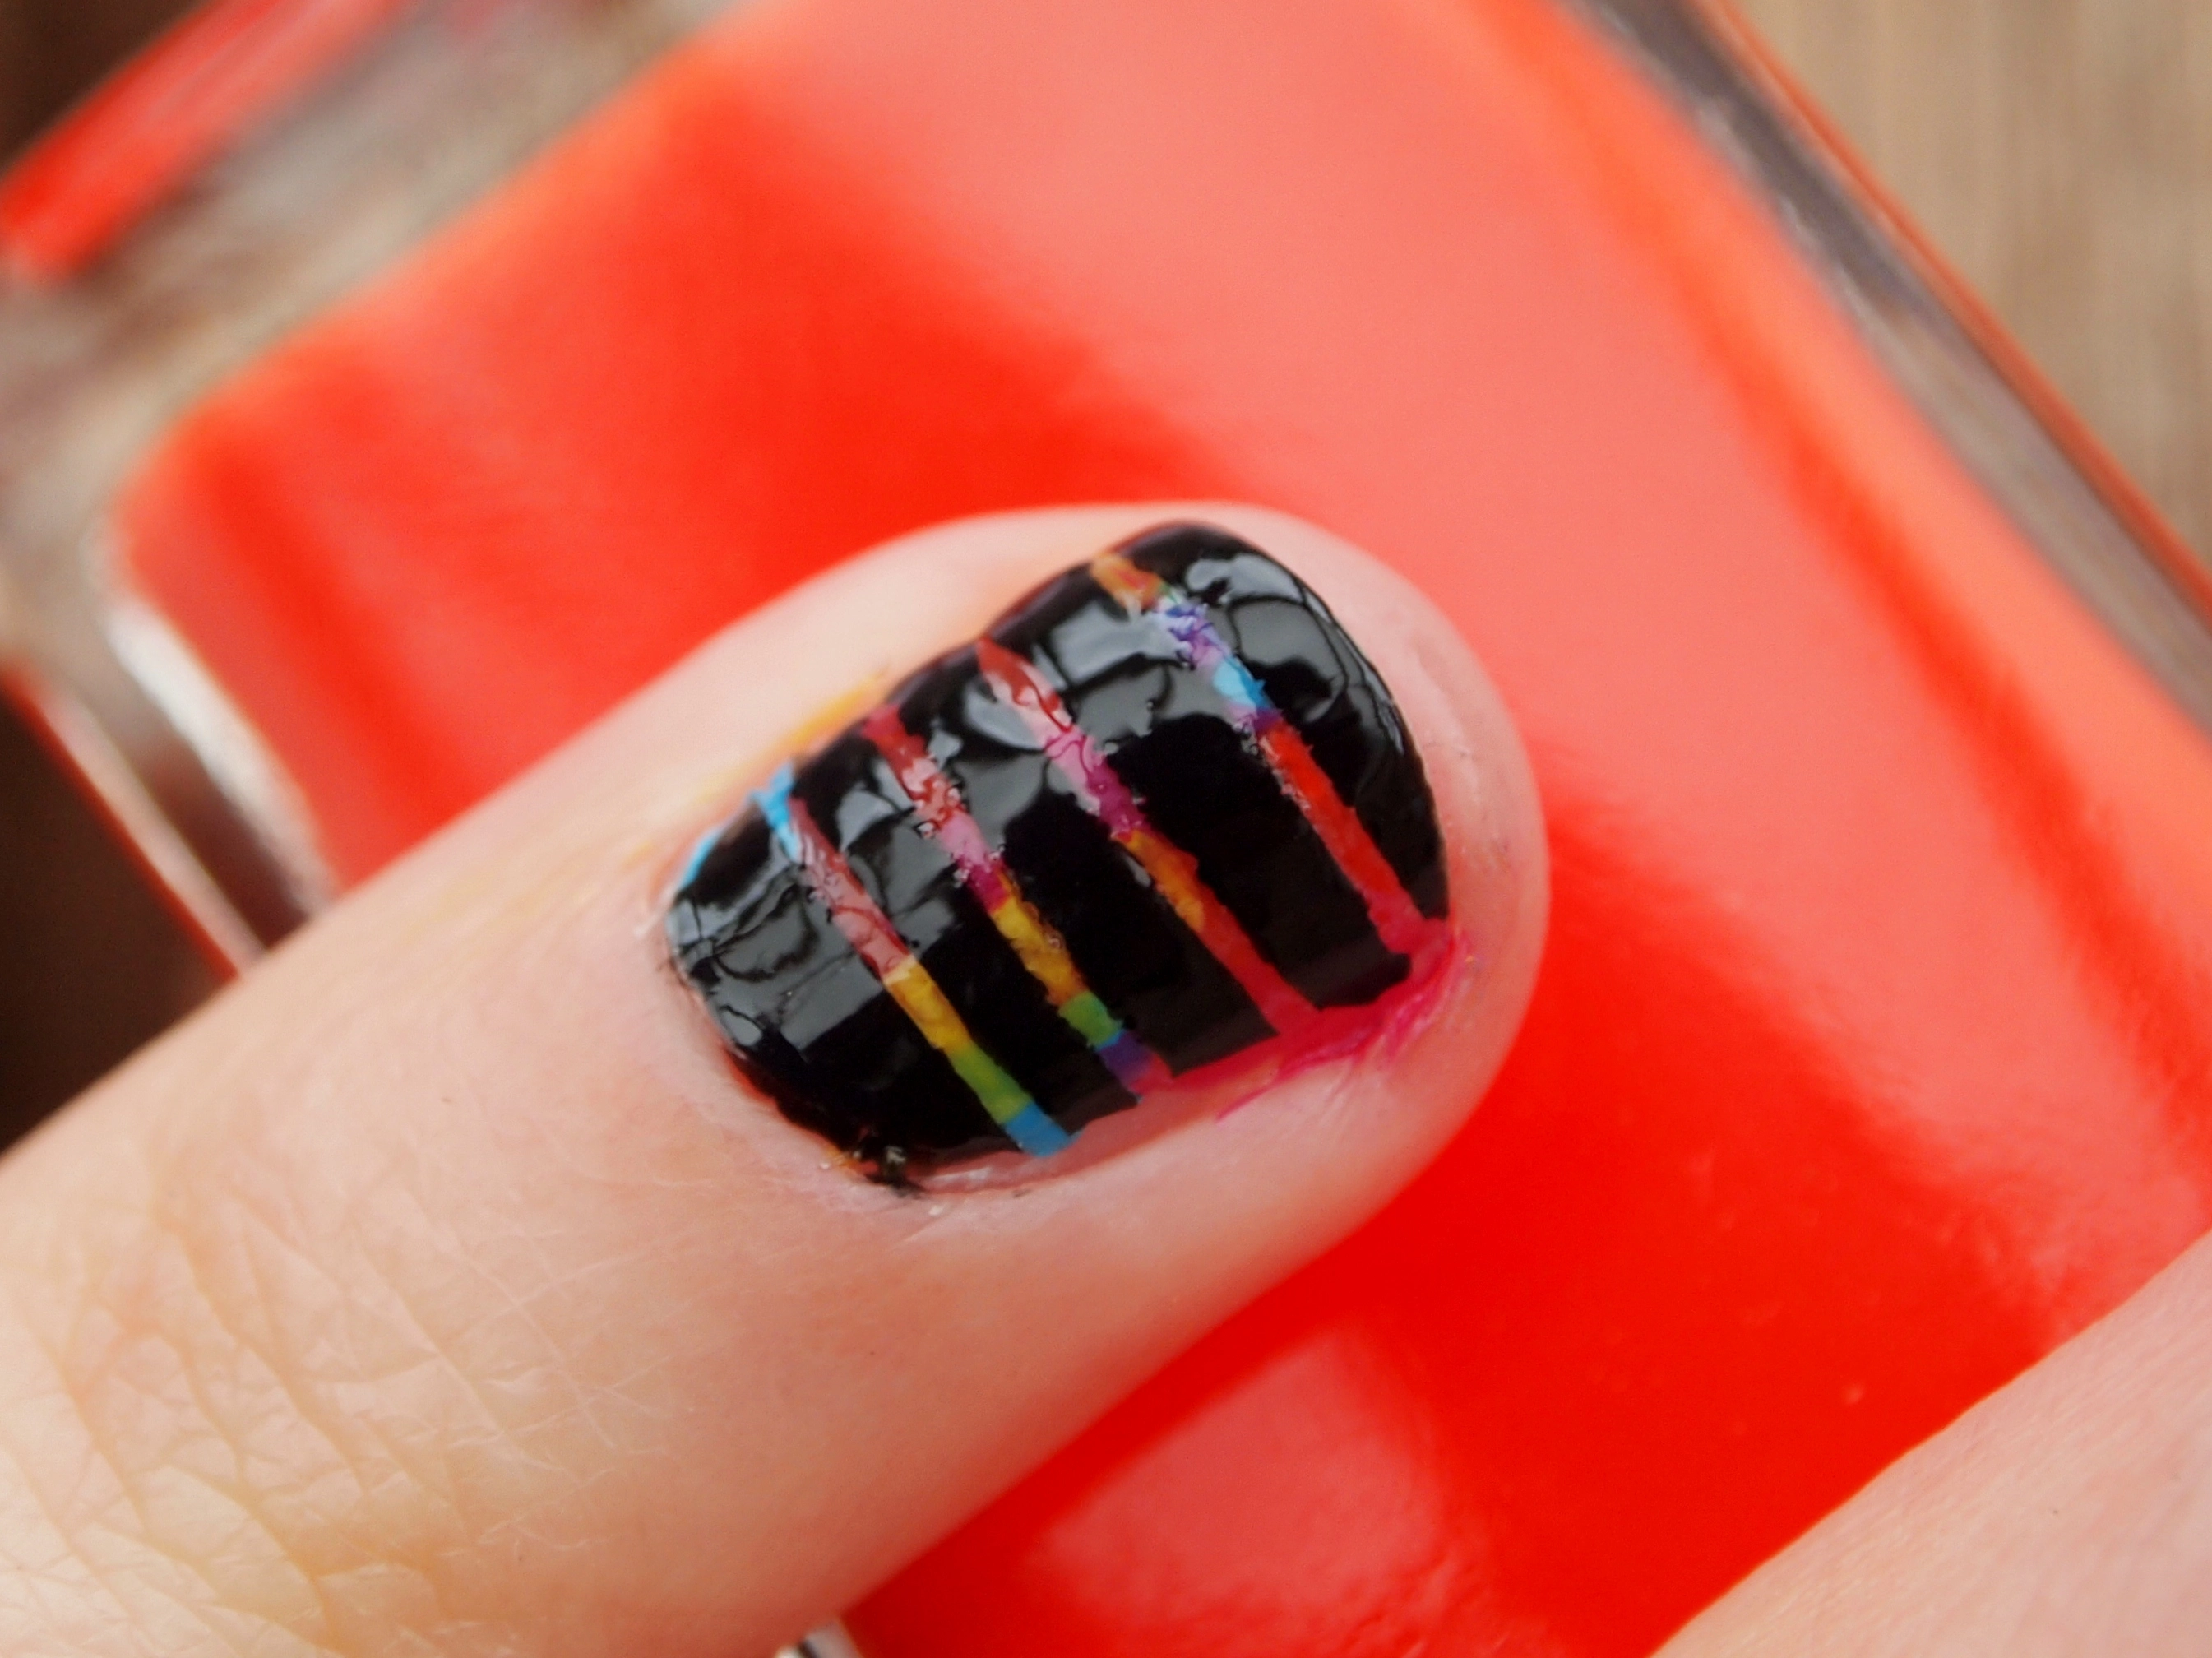
A little while ago I bought some striping tape from eBay and I created a sporty look to celebrate my favourite rugby team reaching the premiership final.  I promised that I would put together some tips on how to use striping tape, so today I thought I’d do my first tape tutorial!  These rainbow stripes don’t use striping tape in the most conventional way, but it still looks really great.  The white pattern on my nail in the photo below is just a reflection, in case you were wondering :)

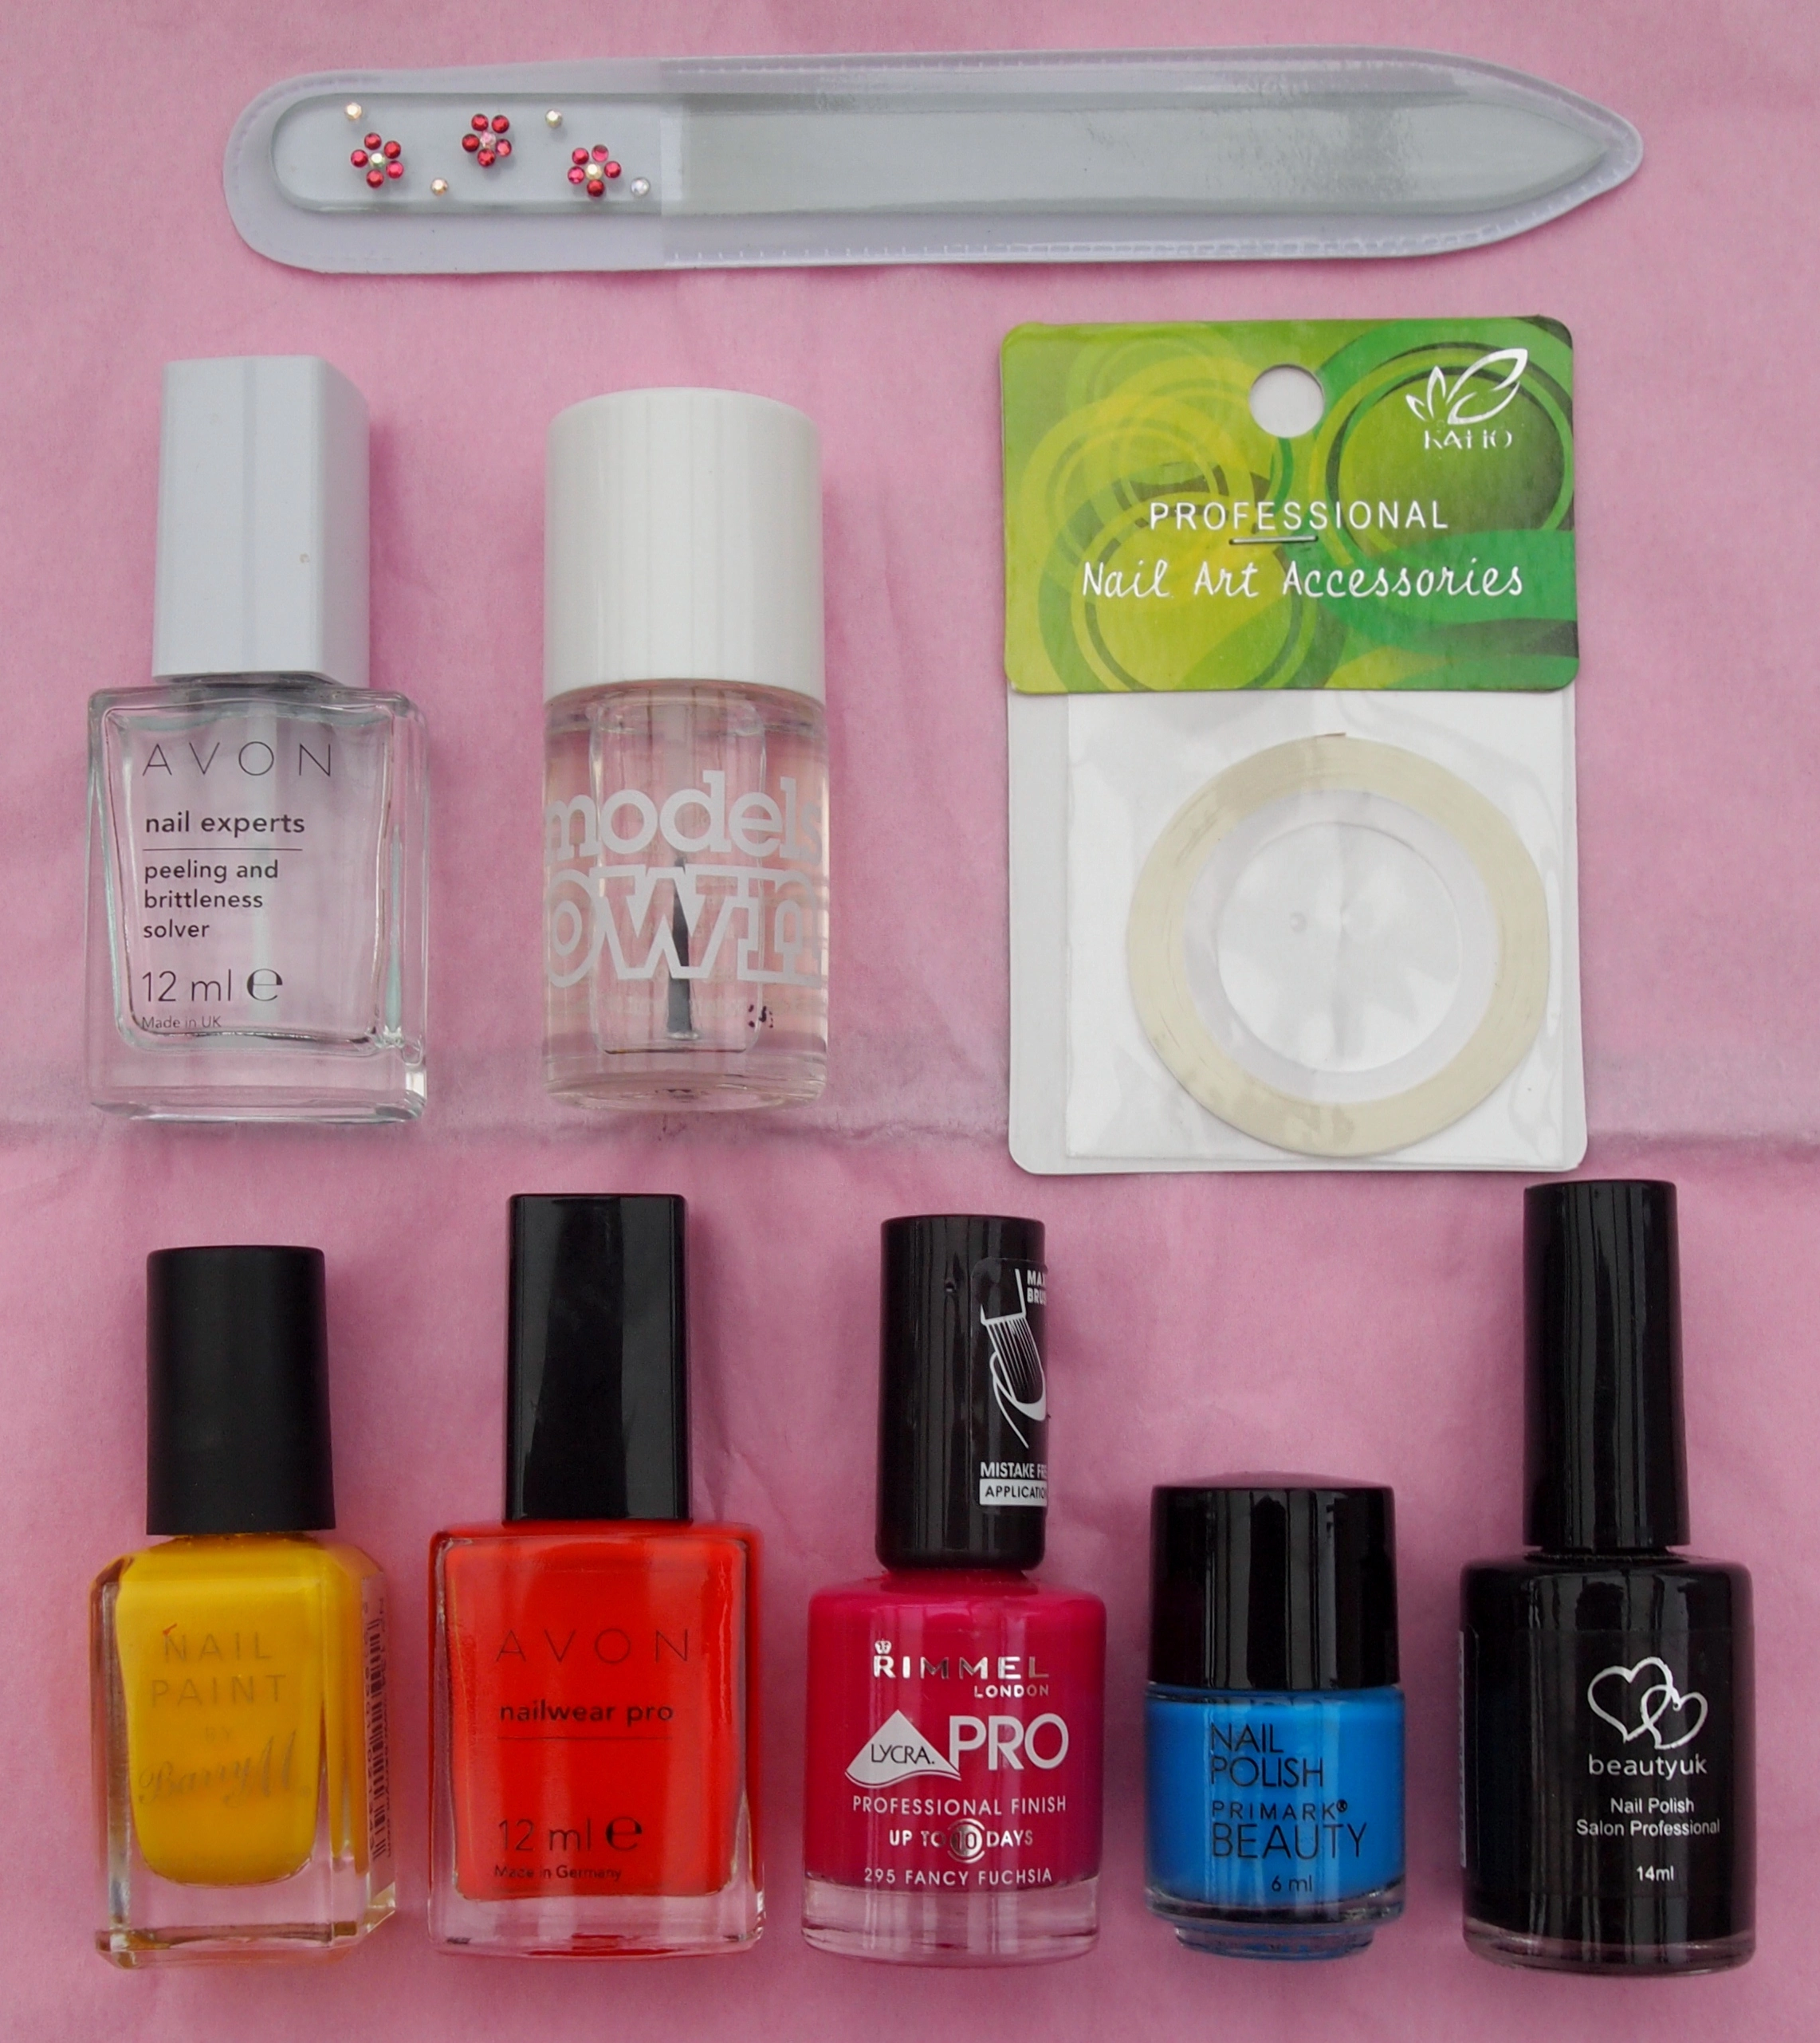
To create this look, you will need the following…

  • A nail file.
  • A base coat and a top coat.
  • Plain striping tape.
  • 3 or 4 bright coloured varnishes.
  • Black nail varnish.

And this is how you do it…

STEP ONE

As with any manicure, the first step is to moisturise your hands, clean and shape your nails (and buff if you like) and apply a base coat, just to make sure your nails stay healthy and don’t stain!

STEP TWO

Prepare your striping tape!  Some people like to cut the striping tape when they need it by placing it on their nails whilst still on the roll and then snipping it, but I find that too bulky so I always cut it first.  Decide how many stripes you want on each nail and then cut enough strips.  I went for four on each.  Make sure you cut them longer than the width of your nail so you can peel them off easily.  Also, it’s best not to pull the tape too hard or it will stretch/curl.

STEP THREE

To create the rainbow base, you need to paint blobs of the different coloured varnishes onto your feature nails.  I chose orange, yellow, pink and blue, as layering the blue and yellow gives green and layering the pink and blue gives purple.  Extra colours without the effort!  Ensure that every bit of your  nail is covered so there will be no bare bits in the finished look.

STEP FOUR

When your nails are dry, place the striping tape over your coloured nails, evenly spaced, and press it down edge to edge so there are no gaps underneath.  Make sure the varnish is completely dry, and not tacky, or the tape will pull the colour off when you peel it back.  Also, it is best to press the excess onto your skin to keep it out of the way.

STEP FIVE

Paint all of your nails black – simple as that!  Just be careful when painting the taped nails so you don’t accidentally lift the tape up :)  Try to apply one opaque layer of black, rather than a few thinner ones, or it will be too thick and ridged when you peel the tape off.

STEP SIX

This is the final step!  When the black varnish is completely dry and not tacky, peel the tape off very carefully to reveal the rainbow stripes underneath, then apply a top coat.  Again, the wobbly bits on my nails in the picture are reflections, not mistakes :)

And there you have it – pretty rainbow stripes in minutes.  What do you think?

Naomi x

NOTD: Easter Brights!

5

Happy Easter everyone!  I hope you’re all having a nice day and enjoying your chocolate eggs :)  Despite the grey skies and cold showers, I thought I’d try and brighten up this Spring celebration with some Easter Bright nails.

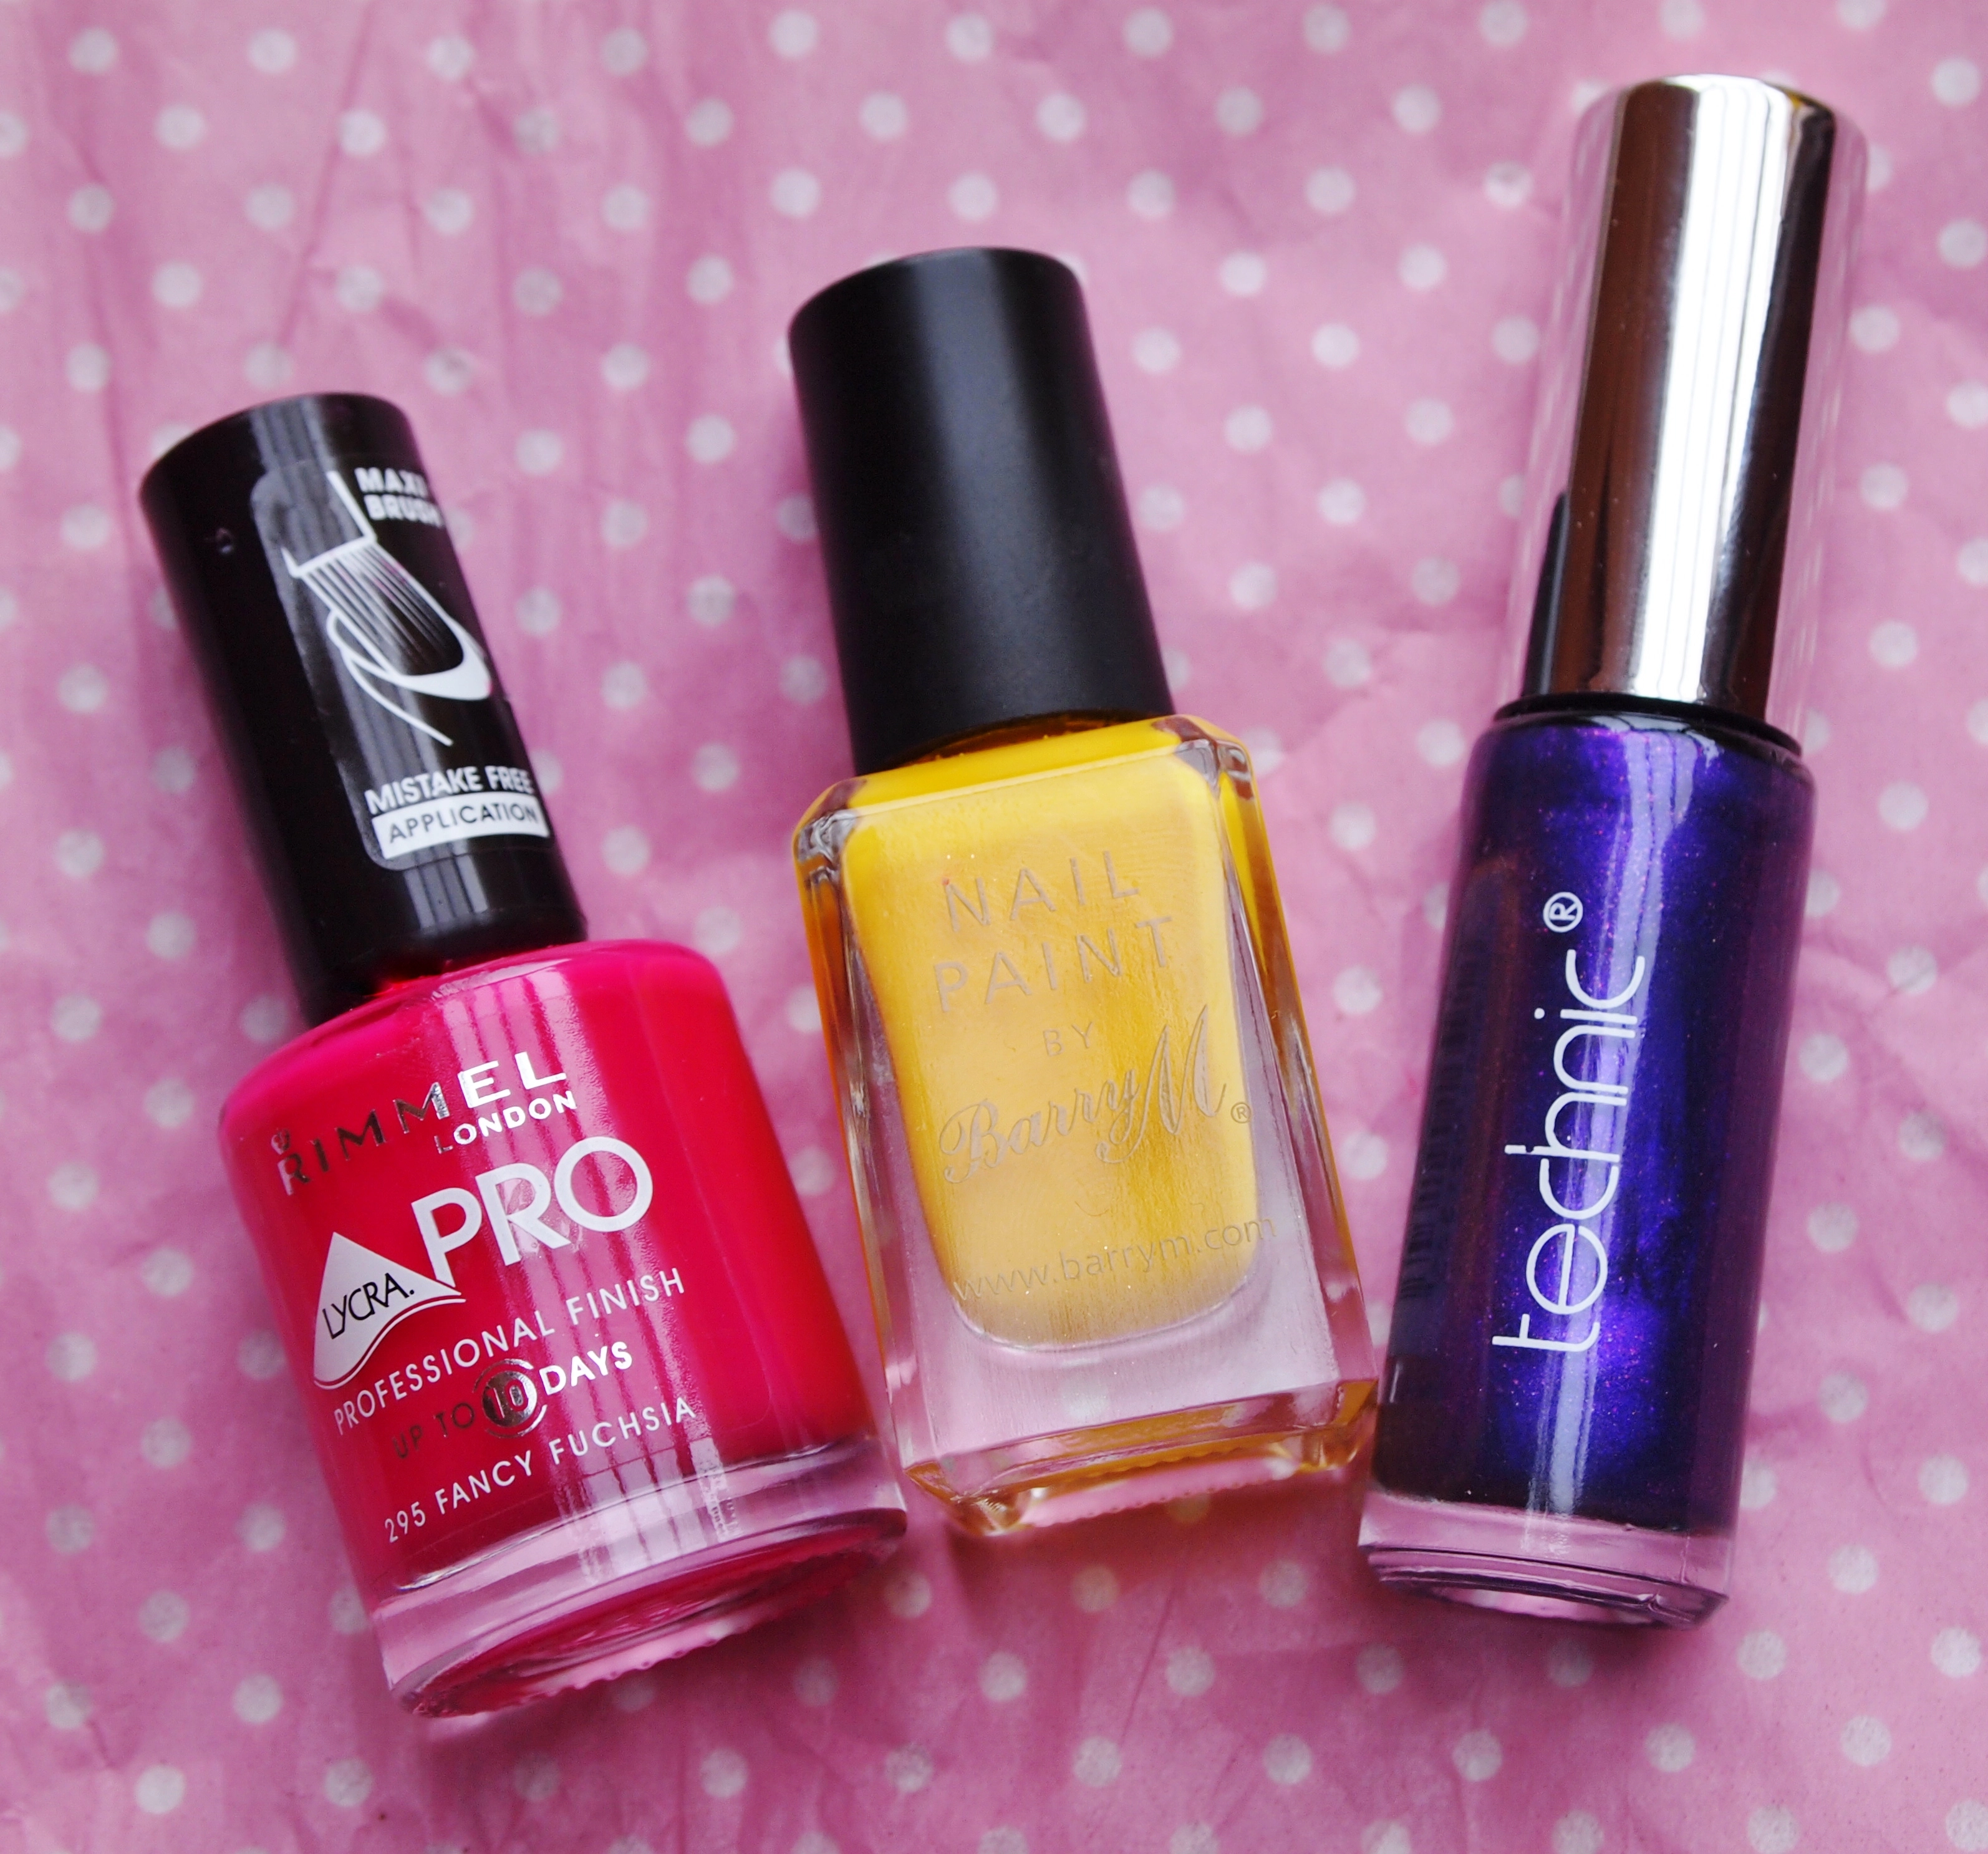
The varnishes I used were:

  • Rimmel Lycra Pro Professional Finish in ‘265 Fancy Fuchsia’
  • Barry M Nail Paint in ‘134’
  • Technic Purple Nail Art Pen

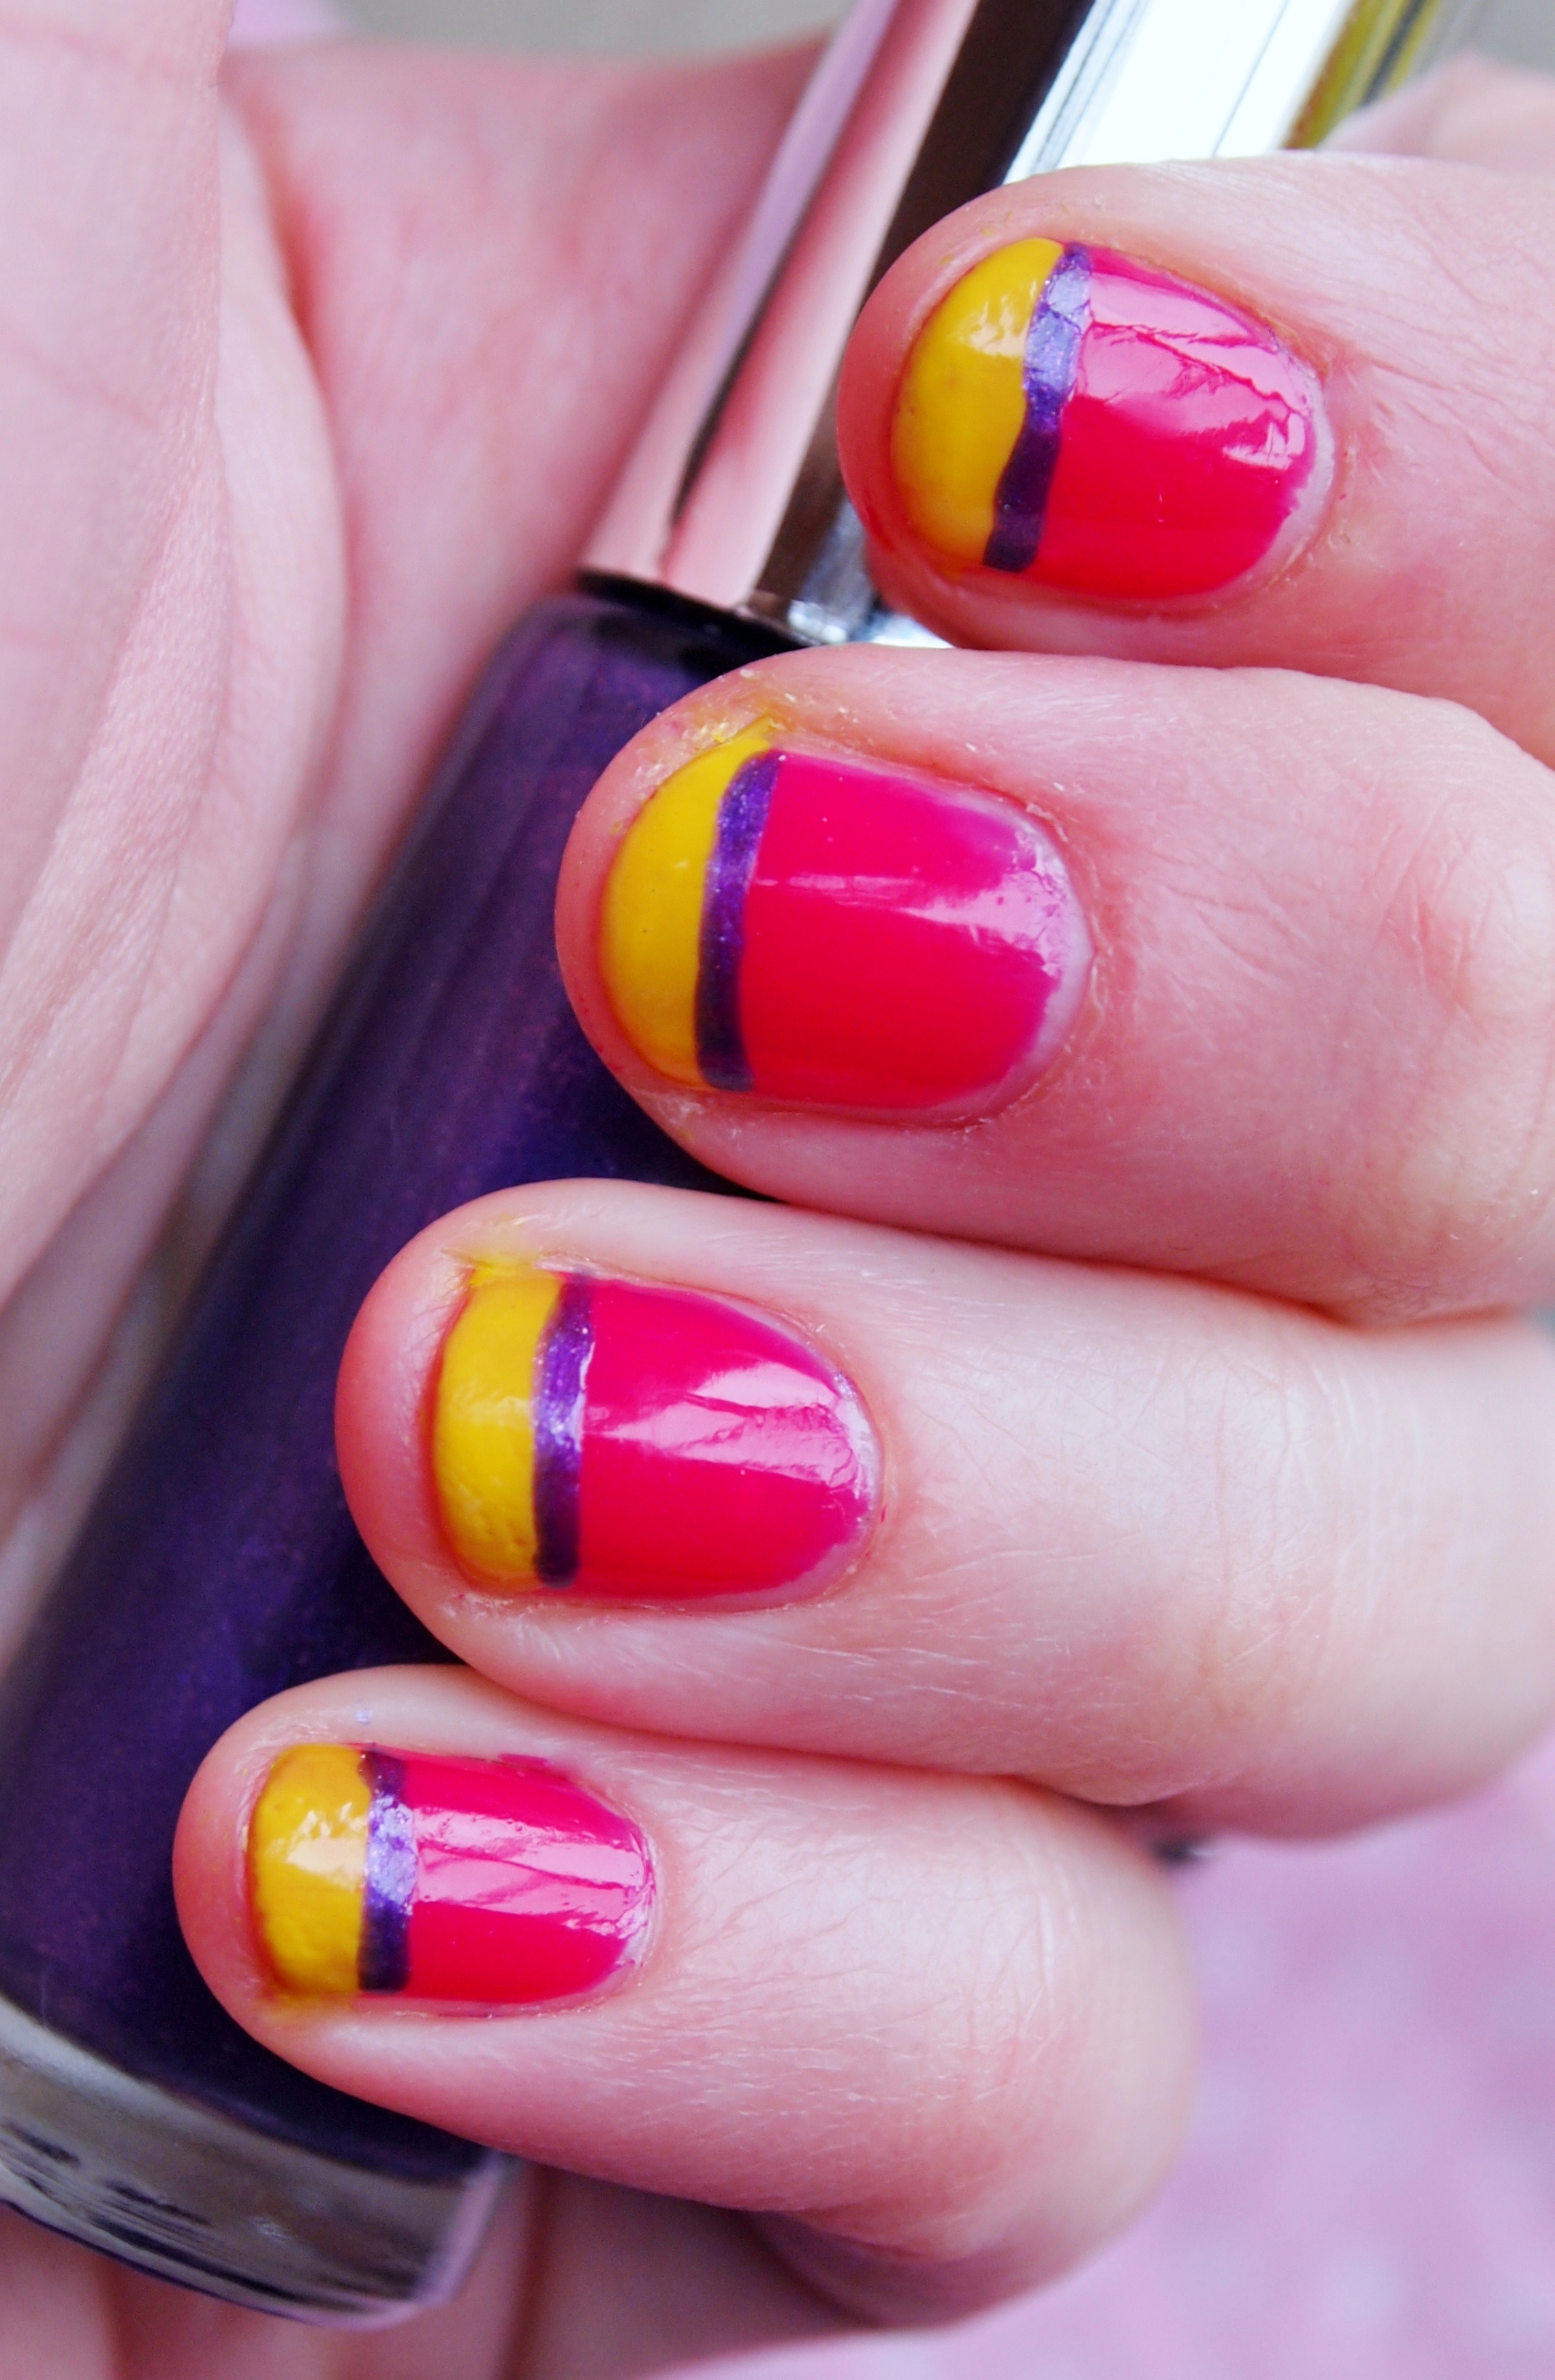
This was the final result!

I painted the tips and purple line freehand, with no guides, on top of the pink and finished with a clear top coat.  I’m pretty pleased with how they turned out as I don’t have the steadiest of hands!

Rimmel’s Fancy Fuchsia is a favourite of mine as it has a wide brush so applies perfectly evenly and dries quickly.  It’s such a stunning shade of pink as well – bold without being garish.

The Barry M yellow was gifted to me recently and I really like it.  I usually steer clear of yellow polishes as I worry they make your nails look stained rather than painted, but this shade is so striking it looks nothing but lovely.

The Technic Nail Art Pen was an eBay bargain at £1.99.  It is actually a very, very fine brush rather than a pen but it is just as easy to control once you get the hang of it.

What do you think?  I’d love to see your Easter themed nails too!

Naomi x

Nail Varnish Haul

7

After a week of waiting, my bargainous eBay nail varnish haul has arrived!  This lot cost just £6.10 (with £4 postage) for fifteen varnishes, but the seller actually sent me twenty so I’m very pleased.  They’re all new/swatched once/used only a couple of times and come from several different ranges.  Read on to find out what they all are!

From Left to Right:

Models Own Smash Up Nail Polish – Black

Models Own Nail Polish – Bronze Rage

Models Own Nail Polish – Pearly Queen

Models Own Nail Polish – Utopia

From Left to Right:

2 True Crystal Nail Polish – Shade 2

2 True Crystal Nail Polish – Shade 4

2 True Crystal Nail Polish – Shade 3

From Left to Right:

Orly Oh Cabana Boy

Orly Chocolate Martini (I think! The name has rubbed off)

From Left to Right, Top to Bottom:

Revlon Colorstay Always on Colour – Ongoing Orchid

Revlon Colorstay Always on Colour – Sheer Sparkling Orchid

Revlon Colorstay Always on Colour – Clear

Revlon Nail Enamel – Lavender Light

Revlon Nail Enamel – Strawberry Electric

From Left to Right:

17 Magnetized Nail Polish – Grey

Andrea Fulerton Nail Boutique Colour – Joanna

L’Oreal Manicure Shine Wear & Shine Top Coat

Maybelline Salon Expert Nail Colour – Sheer Shining Star

Ruby & Millie Nail Colour – Lilac

Fearne Nail Varnish – Taupe

I am so looking forward to trying all of these out. Which is your favourite?

Naomi x

This Week’s Beauty Haul

3

This week I’ve treated myself to a few nice new things, all of them bargain buys as well which makes them all that little bit more awesome!

Today, from Superdrug, I bought a copy of Glamour magazine for £2 and MUA Pressed Powder in Shade 1 for £1.  I don’t usually buy Glamour magazine, but the April issue comes with a free 100ml tube of a Percy & Reed hair product!  There’s four to collect and in total they’re worth £43, making them £10.75 each – well worth the £2 I paid for the magazine!  I went for the Moisturising Conditioner.

The Myleene Klass Nail Wraps were a snip at £2 (I bought them from someone on a forum who was selling them for her mum).  I’ve been wanting to try nail wraps for a while so I couldn’t pass up the chance to get these!

I also bought three Rimmel Colour Rush Mono Eye Shadows in (from top to bottom) Tempted, Siren and Envy, which I’m really looking forward to trying out.

Yesterday, on eBay, I won a batch of 15 nail varnishes for just £6.10!  They’re all new, swatched once or only used a couple of times, and there’s a mix of different brands including Models Own, Ruby & Millie, 17 Magnetic polish, Andrea Fullerton, Orly, Revlon and others.  So excited about receiving them!

I’m going to review each of these products over the next few weeks so please check back soon to see what I have to say!  What have you been buying lately?

Thanks for reading,

Naomi x

Go to Top
%d bloggers like this: