Posts tagged Nail Art
Layla Hologram Effect Nail Polish in Ultra Violet
9On my birthday I got quite a few bottles of nail varnish, and the one I chose to wear on the day was this one from my mum – Layla Hologram Effect in Ultra Violet. I’ve always liked the look of hologram nail varnishes but have never got round to buying one myself, so I was very pleased to see this in my pile of presents, especially as it’s my favourite colour. Thanks mum!
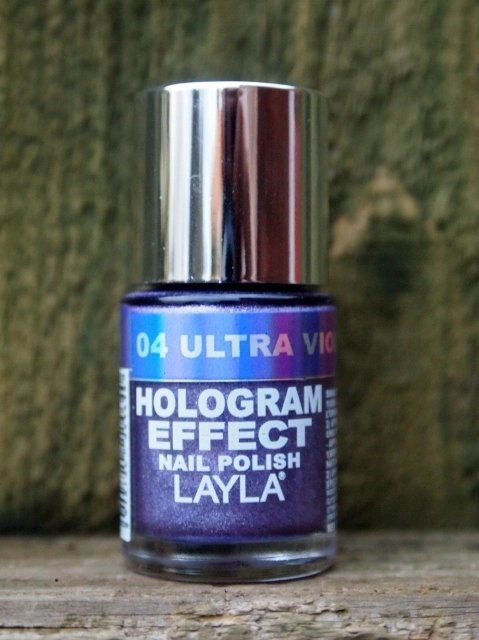
Layla isn’t a brand that I’m familiar with, but according to their website they are based in Milan, Italy, and sell a wide range of make up as well as nail products.
This varnish has a fairly thick consistency, but it comes with a decent brush so applies easily and evenly, and despite the glittery look dries smooth to the touch. However, it does take a little while to dry, and if you attempt to apply the second coat whilst the first is still sticky it can cause some streaking, so it’s best to be patient with application if you want to achieve neat coverage! It only takes two coats to create an opaque finish, which is always my test of a good quality varnish, and this one passes.
In the bottle, Ultra Violet looks a dusky purple colour with an undertone of grey, but on the nails it looks slightly paler. However, once you’re in the right light the hologram effect really comes alive, and it’s impressively strong! The hologram looks 3D and shines a rainbow of red, orange, yellow, green, blue, pink and purple in both natural and indoor light, and at the same time the glitter shimmers beautifully underneath. It’s difficult to put into words just how stunning this varnish is, so here are a few pictures of it in different lights to give you an idea…

No hologram effect.

Hologram effect without flash.
(It actually looks a lot more colourful than this in reality but it was difficult to capture on camera.)


Hologram effect with flash.
I have been wearing Ultra Violet for three days now, with a top coat, and it has lasted really well. The ends have started to chip today so I will probably remove the varnish soon, but other than that the coverage still looks neat and vibrant.
Overall, I would definitely recommend Layla Hologram Effect Nail Polish as it is excellent quality and the hologram effect is powerful and very, very pretty. A lot better than the Boots 17 hologram varnish I’ve seen in reviews! The colour is a bit more interesting than the typical silver hologram too. If you’d like to try this range for yourself, it may be difficult to locate in shops, but Ultra Violet is available on Amazon here, and you can find other shades here.
Do you like the look of this varnish?
Naomi x
Nails Inc Bling It On Leather & Skulls
162013 is set to be another big year for textured nails, and the latest trend is the unusual leather look. Nails Inc recently launched their Bling It On Leather & Skulls set, and it has been causing a big buzz in the world of beauty. I am always keen to try out new and exciting nail effects and I was really intrigued by this when I first heard about it, so I was very pleased to be sent a set to review, from lookfantastic.com.
Bling It On Leather is available in Black or Tan (which is the shade I have), and the set contains a 10ml bottle of Leather Effect polish, four skull embellishments, a 3g bottle of nail glue and a cuticle stick – everything you need to create gorgeous, stand-out nails!
The nail polish shade in the tan set is called Soho Mews, and is a lovely caramel brown colour, tinged with orange. The polish itself is very creamy and highly pigmented, and I found it only took one coat to achieve an opaque, even finish. However, I applied two coats as the instructions suggest. Getting the leather look is very simple, as the polish does all the work for you. Like a crackle varnish, Leather Effect goes on glossy, and before your eyes it develops a leathery textured, matte finish in just seconds. Once the effect has formed, the polish is also completely dry, which is really quite impressive.
If you wanted to dress the Leather Look down for work or day wear you could stop there, but the set also contains four skulls which would be perfect for an evening look. The skull embellishments are made of a gold coloured metal and are studded with tiny crystal gems. They’re actually surprisingly detailed and beautiful for a nail embellishment, and give the leather effect a glamorous yet rocky edge. The instructions say to pick the skulls up with tweezers, before applying a small amount of the glue to the corners and centre of the skull before placing it on to your chosen nail. If you’re careful, you won’t make a mess with the glue, and the skull will stay put. If you’re extra careful, you can remove the skull before taking the varnish off and use it again!
The final look you get with the leather polish and skulls is one of beauty. If, like me, you do everything in your power to keep your newly painted nails glossy and smudge-free, the Leather Effect may take some getting used to, but it really does look like leather and the colour is stunning! Here are two swatch photos to show you how fabulous this look is.
Without skull, to show the Leather Effect.
With skull.
The only downside to the Leather Effect is that it soon chips. To keep the matte finish I didn’t apply a top coat, and within 24 hours the varnish had chipped. However, if you change your varnish regularly this shouldn’t be much of an issue, and if you’re wearing it for a night out then chances are you’ll be removing it within a day anyway.
If you like the look of Nails Inc Bling It On Leather & Skulls, you can order it now for £19 (with FREE worldwide delivery) from LookFantastic, in the classy shade of black – a worthy investment for fans of chic nails and current trends! LookFantastic also stock many other nail brands, including O.P.I, Essie and Butter London. To view their full range, visit here!
Naomi x
*This Nails Inc Bling It On Leather & Skulls set was sent to me by lookfantastic.com for review purposes. All opinions expressed in this post are honest and my own.*
Ciate Velvet Manicure in ‘Mink Cashmere’
10Just before Christmas I was lucky enough to win a Ciate Velvet Manicure set in one of Baobella’s 12 Days of Christmas giveaways on Twitter – thank you Baobella! Baobella are a new online beauty community who are all about ‘the beauty of sharing’. They haven’t launched yet, but there is a lot of excitement surrounding their new website which is almost ready to go live, and they are already making a name for themselves on Facebook and Twitter. Keep an eye on their social feeds for more information about the community!

When Ciate first launched their Velvet Manicure many moons ago, my first impressions weren’t good. I initially thought the velvet looked too thick on the nail, and somewhat unhygienic, but that was before I knew exactly what it was. As I found out more, my opinions soon changed and I was intrigued to try it for myself. So, as you can imagine, I was very excited when this arrived in the post.
My prize was delivered in a bright metallic pink bag, and even contained a little certificate of congratulations – lovely touches which made the parcel a pleasure to open. The set I received is Ciate’s most neutral velvet manicure – Mink Cashmere – which contains a full-size Ciate Cream Soda Paint Pot, an 8.5g bottle of grey crushed velvet powder, and a Little Black Brush. The box also contains a set of instructions, and a plastic tray to catch the excess powder in.

I was slightly worried that the Velvet Manicure would be tricky to apply, but true to Ciate form it is actually extremely easy. It’s really important that your nails are clean before using this, so before I started I wiped my nails with Sally Hansen nail varnish remover, and painted on my favourite Sally Hansen base coat.
The first step in the manicure is to apply a thin coat of Cream Soda to each nail – easy peasy. As with every other Ciate Paint Pot I have ever tried, Cream Soda has a nice, creamy formula which applies evenly, with no fuss, and dries quickly. Once the first coat is dry, a second, slightly thicker coat, is applied. At this stage, the velvet powder is sprinkled over the wet nail, so it’s best to do one nail at a time so the varnish is wet enough to hold the powder.
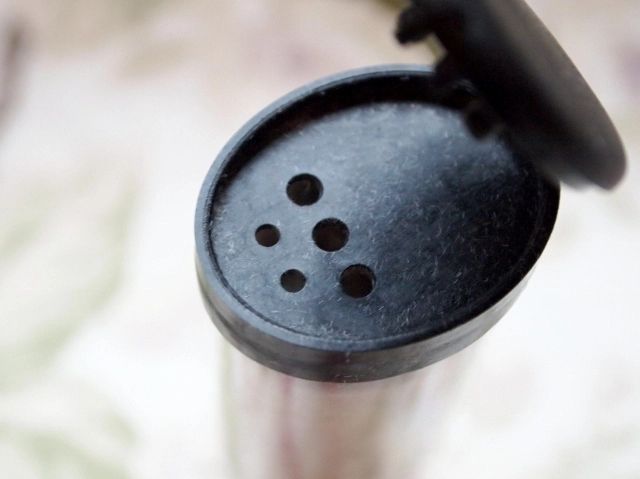
The pot that the velvet comes in has a secure lid with five holes in it, which allows for mess-free, simple application. All you do is shake the pot gently over your wet nails until they are completely covered with a thick layer of velvet. Just make sure you have the tray underneath to catch the bits that miss!
Next, use the Little Black Brush to tidy up. My advice is to wait a few minutes for the velvet to set before doing this, or you might brush off a bit too much and make a mess of your nails, and nobody wants that! Just lightly sweep over the nail to knock off the excess fibres, and then sweep around the edge of the nail, as the powder tends to stick to the skin a little. Then, again using the brush, gather the fallen velvet together in the tray and tap it gently back in to the pot.
And that’s it! Easy, right? The velvet sets firm in around 10 minutes, and so far has stayed put, which is a good sign. It’s survived a good few hand washes too. Here are a couple of swatch photos of the Velvet Manicure. Since this was a test run I have only used the velvet on one nail for a ring finger manicure, but now that I know it’s up to scratch I will be doing a full velvet manicure next time!
Without Flash
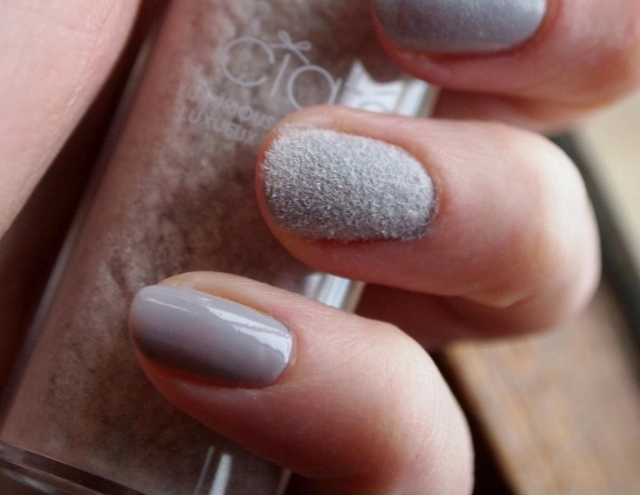
With Flash

On the nail, the velvet feels really soft and smooth, like real velvet, and isn’t too thick at all. Because the fibres are so fine, they don’t clump together, rather, the coverage is very even and looks and feels no thicker than two coats of nail varnish. Both the varnish and the velvet are a delicate grey colour, not my usual choice, but they look extremely classy and I love them both. I’m definitely a Velvet Manicure convert! I think I’ll be asking for the other two shades, Berry Poncho and Blue Suede, for my birthday in February.
To see the full range of Ciate’s Velvet Manicures, visit their website here. The sets retail for £14.00 each, which is excellent value considering they include a full-size Paint Pot! Oh, and don’t forget to check out Baobella too.
Naomi x
Ciate Mini Mani Month Round-Up: Part 3
6Hi everyone,
First off, I would like to wish my sister, Freya, a very Happy Birthday! Today she turns 21, an important age, but she’ll still always be my baby sister, wanting all my things. HAPPY BIRTHDAY FREYA!!

Now, down to business… Today I opened the door of Day 18 on my Ciate Mini Mani Month advent calendar, which means it’s time for another weekly round-up! This post will feature Day 13 up to Day 18, and I have swatches of all but one of the Paint Pots this time. I must admit, my feelings were mixed this week. There were a couple that I really liked, and one or two that I wasn’t keen on at all, but you can’t win them all as they say!
Day 13 – Glass Slipper and Day 14 – Speed Dial
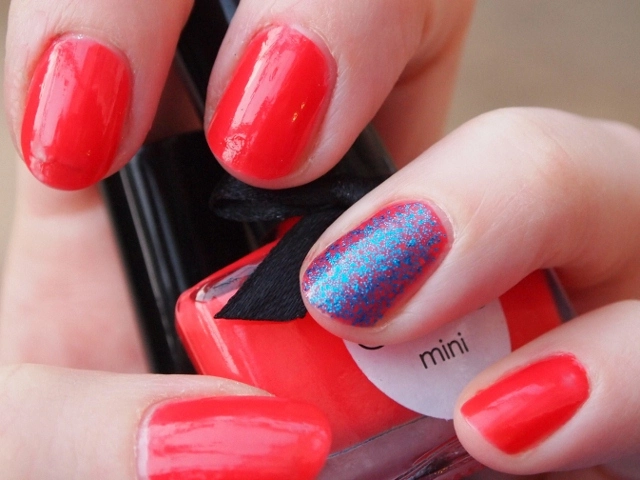
On Day 13 I opened the door to Glass Slipper, a lovely blue glitter polish, and the first of the calendar’s three exclusive shades. The glitter is very fine and beautiful, and doesn’t feel too rough in texture, but it isn’t really dense enough to wear on its own (unless you’re willing to apply 3+ coats). It works perfectly as a top coat however, and is surprisingly easy to remove for a glitter.
Speed Dial is an unusual shade – it looks bright orange in the bottle, but I found it applies somewhere between a red and an orange. It is more orange in real life than it looks in the photo above though. I just can’t quite decide whether I like it or not! It definitely doesn’t look that good with Glass Slipper over the top, but with the right outfit I can see it working. Not one of my favourites, but not bad. It applied evenly and has a creamy formula at least!
Day 15 – Headliner

Headliner is my absolute favourite this week… I seem to have a thing for blues at the minute! It is a dark turquoise blue shade with a stunning creme finish and I love it! As you’d expect, the formula is great and, quite impressively, it only takes one coat to achieve a completely opaque finish (the photo above show two coats, however). Headliner got me a lot of compliments when I wore it, and without a doubt I’ll be wearing this one a lot!
Day 16 – Big Yellow Taxi

Ick, I’m not liking Big Yellow Taxi. I initially thought this looked okay as it appeared quite a creamy banana yellow in the bottle, but when I applied it I was soon disappointed. It has a really strange gloopy formula, so it went on very streaky, and no number of coats seemed to be able to even the finish out. The yellow shade is slightly too bright, and in all honestly it looks like tippex coloured in with yellow highlighter pen – not pretty! On the plus side, it doesn’t leave any stains behind at all. I don’t think I have the skin tone to pull this off, but it would probably look great against darker skin… I may use it for Batman nail art though!
Day 17 – Power Dressing

I haven’t tried Power Dressing yet so I can’t comment much on the formula and colour, but in the bottle it looks like a classic deep navy blue, and I imagine it will have a lovely shiny finish. I’m looking forward to using this!
Day 18 – Candy Shop Caviar Pearls

Candy Shop is the third out of four bottles of Caviar Pearls in the calendar, and so far they are my favourite. The beads are very small and coloured in three shades – turquoise blue, pink and orange. As with the other pearls that I have tried, these are very easy to apply (just pour over a wet nail, press down, and leave to set for 15 minutes), and look really striking against a bright varnish. The purple shade I chose to pair the pearls with is actually Cabaret, one of the shades I didn’t swatch in Part 1, so now you can see what it looks like.
So there you go, a mixed bag of mostly brights this week. Which is your favourite? Please vote below! Check back for Part 4 next Monday, on Christmas Eve, and if you want to see the previous shades in the Ciate Mini Mani Month, they are swatched in my Part 1 and Part 2 posts.
Naomi x
Ciate Mini Mani Month Round-Up: Part 2
9Hi everyone,
Six days have already passed since my last Ciate Mini Mani Month post, can you believe it? The days are flying by and before we know it, it will soon be Christmas day! But for now, as promised, here is Part 2 of my Mini Mani Round-Up, featuring the surprises hidden behind advent calendar doors 7 to 12.

You may be pleased to know that I managed to swatch every single varnish this time, so you can get a more accurate feel for what each one is really like. As usual, they all have that deliciously creamy signature Ciate formula, which applies evenly, dries quickly and is extremely chip resistant. Here they all are in their bottles…

Day 7 – Cutie Pie

Cutie Pie is a pretty, feminine, powdery pale pink shade with a creme finish. I usually prefer bold, bright varnishes to pastels, but this one really is quite lovely and clean-looking. The above look was achieved using two coats of varnish and it’s still quite sheer, but I think three would be plenty enough for a more opaque appearance.
Day 8 – Vintage

Vintage is my favourite varnish from this week. It’s a deep grey colour, but it has a tinge of greeny blue to it which makes it more unusual than most greys. I got so many compliments about my nails on the day I wore this. I have a feeling I’ll be getting a lot of wear out of Vintage – it goes with anything!
Day 9 – Mistress

Mistress is a classic, very bright scarlet red, with a slight orange undertone and a high shine finish. I’m not the biggest fan of orange varnishes so I wasn’t too keen on this when I first saw it, but once I applied it I instantly changed my mind. I think shades like this can look a bit tacky sometimes, but because Ciate is such good quality, it actually looks really beautiful on. The only issue I have with this is that it stained my skin when I removed it! You can see evidence of the staining around my cuticles on the photo below…
Day 10 – Ladylike Luxe & Day 11 – Bumble Bee Caviar Pearls

Ladylike Luxe is a shimmery yellow gold shade, and it’s the best gold varnish I’ve ever tried. For some reason, gold and silver varnishes tend to show up any imperfections on your nails (no matter how small) and though this one isn’t perfect, it definitely disguises imperfections more than any other metal colour I’ve used. Overall this is a fab varnish – very Christmassy!
The Bumble Bee Caviar Pearls consist of two different coloured pearls – black and yellowy gold. I gave myself a ring finger mani with them yesterday, and as you can see it turned out rather well for a first attempt! The pearls were very easy to use… You just pour them over your wet nail, press them down and leave them to set for 15-20 minutes. I absolutely love how they look and feel, but they haven’t lasted very well. This morning when I woke up I noticed that the colour on the gold pearls had faded/rubbed off slightly, and after 24 hours a lot of the beads have already fallen off. I’m not sure how long they’re supposed to last, but I thought it’d be longer than a day!
Day 12 – Twilight

Last but not least, today’s varnish is Twilight – a black base with a gold fleck shimmer running through it, which also looks greeny brown depending on the light. I have a feeling this was intended to go with the Bumble Bee Caviar Pearls, and indeed it is a great match. A gorgeous, classy shade to round off the week.
Which one of this week’s minis is your favourite?
Don’t forget, you can read Part 1 of my Ciate Mini Mani Month Round-Up here. Check back next Tuesday for Part 3!
Naomi x
Nails by AB
15A few weeks ago I was asked by Amy of Nails by AB to review a set of her gorgeous false nails. Amy is a trained beauty therapist and her new business, Nails by AB, specialises in creating personalised designer nails which are painted according to your own specifications, and then posted out to you. Having seen some of Amy’s designs on Twitter I was hugely impressed so, of course, I jumped at the chance to try some of her nails for myself. The design I asked for and swiftly received was a set of bang on trend owls.
The nails came very nicely packaged in a drawstring bag, and a handy little tube of nail glue was also provided.
This stunning owly set contains 18 nails (9 pairs of differently sized nails), so you’re guaranteed to find a complete set that fits you in amongst them. A set of 18 owl nails costs £8.50 (including UK postage), which is incredible value for money considering the amount of effort that goes in to painting them! However, if you want a smaller set (which usually costs less) Amy will ask you to measure the width of your nails upon ordering, so that she can choose, tailor and shape your nails specifically to fit you. How great is that?
As I’m sure you can tell from my photographs, the quality of these nails is excellent. The design is simple, yet really carefully and neatly painted, and the colours used are really bold. I absolutely love these little owls, they’re just so cute, and it is obvious that Amy has a real talent for nail art!
Both my sister and I have tried these nails on and we both agree that they are very comfortable. The nails themselves are made of plastic, which is thin enough to be flexible and look like a natural nail, but not too thin so that they break easily. The glue that is provided keeps the nails on for a good while (basically until you decide to take them off), so if you want your nails to last longer than just a night out, these will.
The photographs below were modelled by my sister. She has far shorter nails than me so I thought it would be a good idea to show that the nails stay put even on short nails…
The Nails by AB range features many quirky, bespoke designs, including the latest Moustache Nails which cost £9.50 a set and celebrate Movember, with £4.00 of the proceeds being donated to the Movember charity. However, Amy is more than happy to paint a set of nails to your own design if you have something specific in mind. Nails by AB nails start at £6.50 a set, but only go as high as about £10.00, which is so worth it when you consider what you’d pay for a salon manicure.
If you would like to order some pretty little nails from Nails by AB, you can do so via Amy’s website, on eBay (under nailsbyab), through the Nails by AB Facebook page, or even through the Nails by AB Twitter account. Payment can be made through PayPal or Credit/Debit Card, and once payment has cleared your nails should hopefully be in the post to you within 2-3 days, sent FREE by second class post.
Nails by AB’s products and service are top class, and it is obvious that so much care and passion is put into Amy’s work, so please help to spread the word about this nifty little company!
Naomi x
Firework Nails featuring Technic ‘Carnival’
16Here in the UK we celebrate Bonfire Night on the 5th of November, to remember Guy Fawkes’ plot to blow up the houses of parliament. Celebrations always involve a lot of beautiful fireworks, and this year I was lucky enough to see not one, but TWO displays! The first was a small one in our back garden last Friday, with some of the extended family. We ate homemade pizzas, jacket potatoes, burgers and hotdogs, as well as some of my extra special homemade chocolate dipped shortbread, whilst we set off a few boxes of rockets and fountains. Then, on Saturday, I went to the big display they hold at a local park, which I’ve been to every year since I was about three years old. They had a huge bonfire with a Guy on top and a 20 minute long display with some of the biggest, loudest fireworks I have ever seen! We had hot, sugary doughnuts too which tasted amazing.
I absolutely love fireworks so this time of year is always a lot of fun for me. My city is also currently celebrating Diwali, the Hindu festival of light, so there are twice as many fireworks for me to enjoy. To show my love for the firework season, I decided to give my nails a colourful, sparkly makeover, using No7 Stay Perfect ‘Violetta’ and Technic ‘Carnival’.
To create this look I applied two thin coats of No7 Stay Perfect ‘Violetta’, then layered Technic ‘Carnival’ over the top. I attempted to graduate the glitter by applying more to the tips of my nails, but it didn’t work as well as I wanted it to, probably due to the mixed size of the glitter flakes! I still love how they look though. I chose the dark background to represent the night sky, and the bright glitter gives a firework-like burst of colour over the top.
Technic ‘Carnival’ is an amazing mix of almost every colour glitter you can imagine, including pink, purple, red, blue, green, gold and silver. Isn’t it pretty? I picked this varnish up from Leicester Market last year for just £1, and for the price it is fantastic quality. The glitter is suspended in a clear varnish which isn’t gloopy or runny, but the consistency is thick enough to keep the glitter firmly in place when on the nail, whilst acting as a decent top coat. It dries really quickly too which is always a bonus.
What do you think of this glittery look? I hope you all had a brilliant Bonfire Night!
Naomi x
Nail Art: Halloween Pumpkins
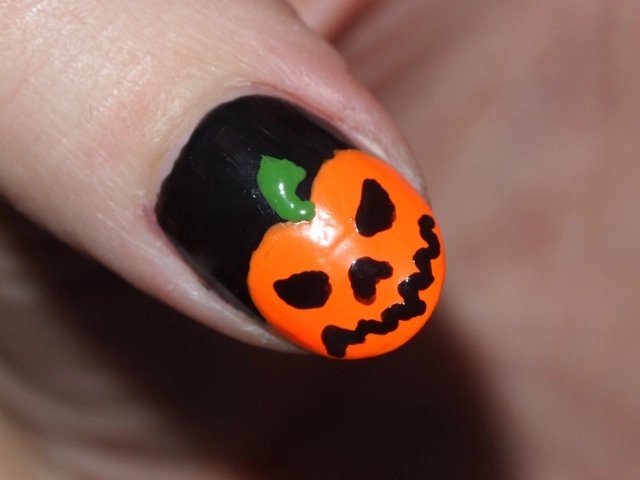
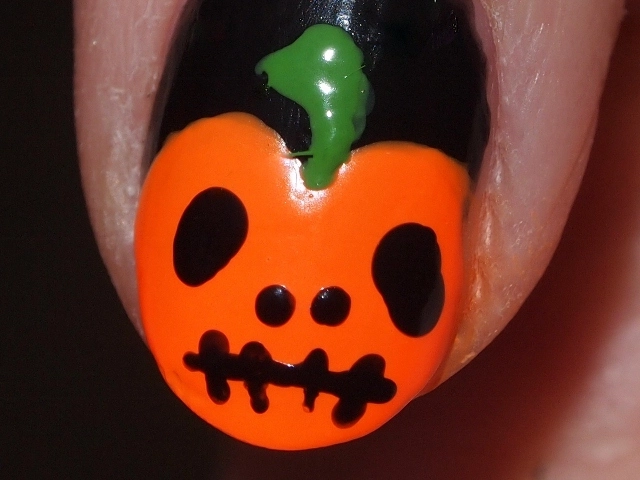
18Happy Halloween everyone! Halloween has always been one of my favourite days of the whole year, and every October 31st I love to dress up and cook up a big feast for my family and friends. This year is my first Halloween as a beauty blogger, so I thought I would create some Halloween inspired nail art to share with you all. So, here are my Halloween Pumpkins!
Aren’t they cute? The whole design took less than half an hour to do and I’m so happy with how they turned out. The colours I used to create this look are:
- Models Own ‘Orange Sorbet’
- NYC In A Minute ‘High Line Green’
- Primark ‘Black’
I hope you’ve all had a spooktacular day 
Naomi x
Models Own Sale Haul and Nail Art
13A few weeks ago, to celebrate reaching a whopping 100,000 ‘likes’ on Facebook, Models Own had a 50% off everything sale on their website! As a nail varnish hoarder and a massive fan of Models Own I couldn’t pass up the chance to add to my ever-expanding collection of pretty polishes, so I ordered five bright and beautiful colours. If I was richer I would have bought a lot more, but unfortunately my budget doesn’t allow for that at the minute  Models Own nail varnishes usually sell for £5.00 each, but in the sale they only cost £2.50.
Here are the shades I bought, also featuring some simple, fun nail art to show that I’m dotty about Models Own…
From Left to Right:
- Hed Kandi – Balearic Cool
- Purple Passion
- Orange Sorbet
- Green Tea
- Scarlett Sparkle
I love every single one of these colours and I’m so pleased with all of them. I wore Green Tea for most of the week and I was hugely impressed with it (it lasted for days without chipping) so keep an eye out for my full review which will be posted within the next few days.
I have entered the above photograph into Models Own’s Facebook competition, which involves posting a photo of your sale haul. The most creative photo will win a full refund of their order, and a set of their NEW, absolutely beautiful Wonderland nail varnishes, so I have my spotty fingers crossed!
Which Models Own shade is your favourite?
Naomi x
Nail Art: Chikara King of Trios
7My fiancé absolutely loves wrestling and, though I’m not much of a fan myself, I do quite like some of the masks that some of the wrestlers wear. One of the wrestling companies that my fiancé likes is called Chikara, and every year they run a King of Trios tournament in which many teams of three wrestlers fight each other in rounds until one team becomes the ‘King of Trios’. This year’s winners were a team called the Spectral Envoy, so to celebrate their win my fiancé asked me do some Chikara themed nail art. I couldn’t say no, and since the winning team wore wrestling masks it seemed only right to paint these onto my nails! And here they are…
The wrestlers behind the masks are called (from thumb round to the ring finger):
- UltraMantis Black
- Hallowicked
- Frightmare
- Crossbones
… and the blue symbol on my pinky is the Chikara logo. Apparently Crossbones isn’t an official member of the ‘Trio’ (otherwise there’d be four of them, not three), but I’ve been told he turned up this year to help them win.
I used my trusty old dotting tools to draw this design and I’m really pleased with how the masks turned out, especially since the whole painting process only took about 20 minutes in total! My fiancé has already shown a photo of my nails to a lot of his wrestling friends from around the world and they were all very impressed, so they have the wrestling fan seal of approval at least!
The nail varnish shades I used were…
- Primark Nail Polish in ‘Black’
- Avon Nailwear Pro in ‘Coral Beat’
- Laval Crystal Finish Nail Polish in ‘White’
- Leichner Nail Gloss in ‘Blueberry’
I mixed the orange and blue shades with a little bit of white so it would stand out more on the black background and, as you can see, it worked quite well.
So, what do you think? This is something a little bit different for me but I definitely want to do another wrestling mask themed design in the future!
Naomi x


