Posts tagged Barry M
NOTD: Barry M Glitterati ‘Fashion Icon’
0When it comes to nail products, Barry M are one of my favourite brands, so when they announced a flurry of new shades for Autumn/Winter 2014, I was incredibly excited! As well as adding new colours to their Gelly, Silk, Classic and Aquarium ranges, and releasing some gorgeous Christmas glitters, Barry M have also launched the new Glitterati collection. Glitterati features six ‘blinging’ glitter paints, and they really caught my eye when I first saw them on Instagram.
So far I’ve only picked up three shades from the new selection – Rockstar and Fashion Icon from Glitterati, and the new Aquarium Glitter, Atlantis. I’ll be posting about each shade individually over the coming weeks, plus any more that I end up buying, but today’s NOTD is Fashion Icon.
Blue and purple are two of my favourite and most worn colours, so I was immediately drawn to this beautiful shade. Fashion Icon has a purple base with a blue duochrome effect, and is packed full of micro glitter, some of which is holographic. I find this shade so mesmerizing as it looks different every time I look at it. It goes from electric blue to grape purple to bright violet in one movement, whilst all the time remaining strikingly sparkly.
All of my swatches show three thin coats, with no base coat or top coat, which I think looks great, but I bet it’d look just as gorgeous layered over a deep purple shade.
I’ve also found Fashion Icon to be impressively hard-wearing. Despite spending the whole day cleaning, unpacking boxes and generally being busy, my nails look just as good as they did when I first painted them.
I can really see this wonderful shade becoming one of my all time favourite glitters, and I can’t wait to swatch Rockstar to see if it’s as stunning as this one.
Barry M’s Glitterati nail paints cost £3.99 each, and are available in store and online from Superdrug and Boots, and online from Barry M.
Naomi x
Share this:
Limited Edition British Summer Barry M Nail Paints
1To celebrate the slow but sure arrival of the British summer, Barry M have launched two limited edition nail paints, exclusive to Superdrug. Both shades have a pastel bright colouring, which is very on trend this season, and a shimmer finish which looks stunning in the summer sunshine.
Promenade is a gorgeous pink shade, which is reminiscent of the candyfloss and sticks of peppermint rock that you find adorning the British prom. It’s such a happy colour, and really gets you in the mood for a fun day on the seafront!
Seaside, my favourite shade, is a glistening blue that brings to mind the sea and skies of a hot day in July. It’s so pretty, and I can just imagine a mermaid wearing this one.
As with all Barry M nail paints, Promenade and Seaside both apply like a dream, and dry incredibly quickly, which means more time outside enjoying the sun!
Barry M’s British Summer nail paints will be available in Superdrug, whilst stocks last, between 4th June and 1st July, and you can choose one for FREE when you spend £6! Which colour will you be snapping up?
Naomi x
*These Barry M Nail Paints were sent to me by Superdrug for review purposes. All opinions expressed are honest and my own.*
Share this:
Barry M Gelly Hi Shine Nail Paint in Greenberry
12Last week Barry M launched four more Gelly Nail Paint shades as part of their Spring collection – Lychee (nude), Dragon Fruit (pink), Greenberry (green) and Papaya (orange). When I saw the new colours advertised on their Facebook page I instantly fell in love with Greenberry, and since I’d never tried a Gelly before I made a special trip into town to pick this up not long after the launch. Barry M’s Gellies are supposed to have a gel effect finish which is highly glossy. I find Barry M’s standard Nail Paints are already very shiny, so I couldn’t wait to put the Gelly to the test to see whether it lives up to its name.
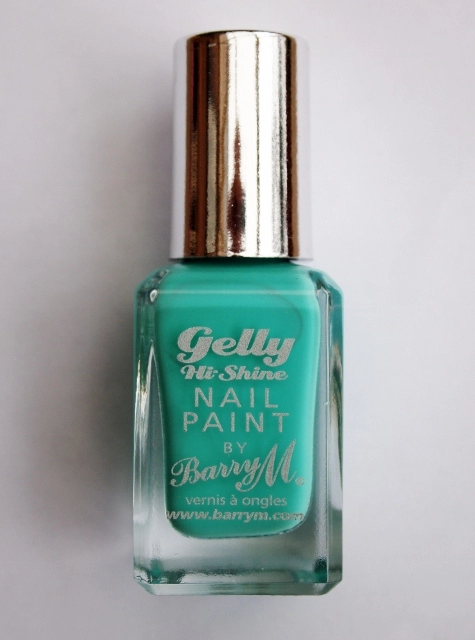

Barry M’s Gelly varnish has a thick but creamy consistency, which applies extremely smoothly with no streakiness. However, if you have too much varnish on the brush it can apply a bit too thickly, so its best to apply as thin a coat as possible and build up from there. I made the mistake of applying fairly thick coats at first so the coverage was instantly completely opaque, but I applied a thinner second coat over the top for good measure. As with all Barry M Nail Paints, the Gelly dries to the touch rather quickly. I put this on not long before I went to bed, but I didn’t wake up with fabric imprints on my nails, which is always a good sign with me!

Greenberry is an extremely beautiful greeny turquoise shade, and is delicately bright. It’s almost a pastel neon if that makes sense! It has a creme finish, and of course, an intense shine which you can almost see your reflection in. In my experience, it’s quite rare for a creme varnish to have such a shiny appearance, so it definitely lives up to its name. It doesn’t even need a top coat!
This Nail Paint lasts really well too. I first applied Greenberry on Sunday, without a top coat, and didn’t remove it until yesterday, and after four days of wear chipping was minimal. There were a few nicks at the ends of my nails on my right hand where I caught them on the zip of my bag, but other than that the varnish still looked as bright, shiny and smooth as it did when I first applied it – just like a gel manicure!
Overall, I am suitably impressed with Barry M’s Gelly Nail Paint as it looks great and lasts long, and to top it off Greenberry is a gorgeous colour. The Gellies cost £3.99 each in Boots and Superdrug, which is £1.00 more than most Barry M’s varnishes, but its well worth it for that extra shine and staying power.
Have you ever tried a Barry M Gelly? What did you think?
Naomi x
Share this:
Mini Nail Varnish Haul featuring Models Own and Barry M
20Hi everyone,
Just a quick post from me today as I want to share with you my recent nail varnish buys. As well as the Models Own sale items I ordered a few weeks ago, I have acquired a few more shiny pretties lately. In fact, they’re ALL glittery! It must be the time of year, what with the party season and Christmas just around the corner.
The most exciting new varnishes in my collection are three from the new Models Own Wonderland range. The range features five sparkly, wintery glitters, all of which give a different stunning effect. The three I went for are…
From Left to Right:
- Northern Lights (pink micro holographic glitter)
- Southern Lights (purple micro holographic glitter)
- Jack Frost (Blue micro glitter in clear varnish)
Aren’t they ABSOLUTELY BEAUTIFUL?? The photos really don’t do them justice. I can’t wait to try them on! I nipped into Boots to buy these yesterday and was extremely pleased to find them included in a 3 for 2 offer, so I got all three for a total of £10, saving £5. If you want the whole set I recommend you grab these whilst they’re on offer as it works out cheaper than buying the full boxed set from the Models Own website!
The next varnish in my little haul is a new one from Barry M – Ruby Glitter.
Barry M released this shade along with a few other glitters a few weeks ago. There are quite a few in the range that I would like (especially Amethyst Glitter), but I went for this one first because I instantly fell in love with it. It consists of different sized flecks of black glitter, studded with red/magenta glitter. It reminds me of Valentines Day (my birthday) for some reason… It just has an air of passion and luxury about it! Like most Barry M Nail Paints, Ruby Glitter retails for an affordable £2.99.
The final little gem in this haul is one that my mum brought back from Portugal last week – a lush purple shade from a range called ‘Yes Love’.
This varnish is Cadbury purple with a delicate golden shimmer running through it. I’m wearing this at the minute and it looks really lovely on. Apparently it only cost a bargainous 1 euro as well, which is a miniscule price tag for such a good quality varnish.
I’ll be reviewing all of these varnishes over the coming days and weeks, starting tomorrow with the ‘Yes Love’ purple so keep an eye out. Which is your favourite so far?
Naomi x
Share this:
Chocolate Treat Week: Nails
5In this penultimate Chocolate Treat Week post I will be talking about all things nail related. I will be sharing my favourite chocolate coloured nail varnish, by Barry M, as well as some new nail art featuring five of my favourite chocolate treats! See if you can guess what they are. Oh, and of course there’ll be a few words at the end of the post from one of my favourite bloggers, in The Last Rolo.
Nail Varnish… Barry M Nail Paint in ‘Chocolate Brown’
Since first discovering them many moons ago, I have always loved Barry M’s Nail Paints, so it seemed only natural to include their ‘Chocolate Brown’ shade in this post. Like all of their paints, this one has a fantastic formula. It applies effortlessly easily and leaves no brush strokes or streaking behind, and opaque, even coverage can be achieved in just two coats. The paint dries impressively quickly too so there’s no hanging around for hours waiting for it to dry, and as you’d expect of Barry M it is very long-lasting.
‘Chocolate Brown’ is a really stunning shade, and it has a high shine, creme finish which gives it a true look of chocolate! The brown colour is highly pigmented with an undertone of orange so it isn’t too dark. As such, even indoors in dim light it looks rich brown rather than dull black. I’m sure you’d all agree that ‘Chocolate Brown’ is perfect for Autumn/Winter 2012 as deep, earthy nail shades are bang on-trend right now.
Barry M Nail Paints are available in Superdrug and Boots for £2.99 each, but as far as I know they aren’t currently stocking this shade. However, you can get it even cheaper on a great website I discovered recently called Scentsational. They are selling ‘Chocolate Brown’ for £2.95 with free delivery, but if you ‘Like’ their Facebook page you can get £1 off your order! That’s how I got hold of this shade, so you can definitely trust the website and discount code!
Nail Art… Chocolate Wrappers
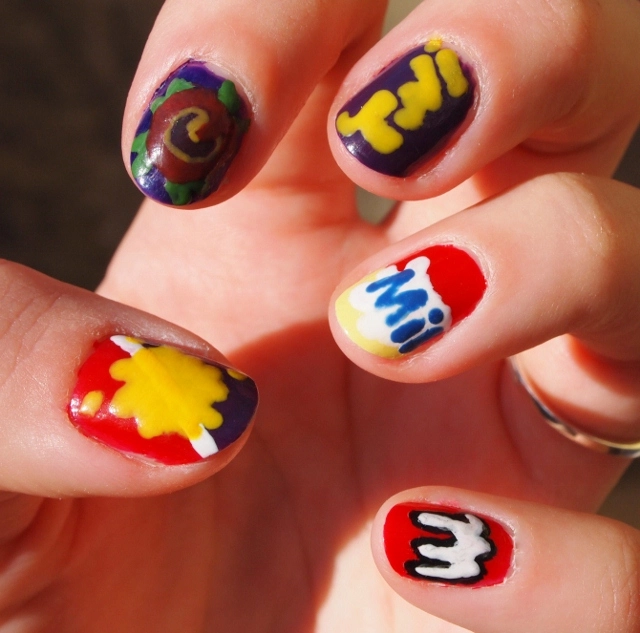
After much deliberation about what I would do for a chocolate themed nail art design, I came up with this – the wrappers and logos of five of my favourite chocolate treats! Can you guess what they are?
If you said (from left to right) Cadbury’s Creme Egg, Terry’s Chocolate Orange, Cadbury Twirl, Milky Bar and Maltesers then you are correct! I had a LOT of fun creating this look and I’m very pleased with the results… Especially the Milky Bar nail! I surprised myself with how neat and accurate I got the font on that one. As usual, I used nail dotting tools to draw this design, and the colours I used were:
- Avon Nailwear Pro ‘Real Red’
- Saffron ‘Shade 16′ (Purple)
- Rimmel 60 Seconds ‘Blue My Mind’
- Barry M ‘Yellow’
- Barry M ‘Chocolate Brown’
- Laval Crystal Finish ‘White’
- Primark ‘Black’
- NYC In A Minute ‘High Line Green’
- Avon Nailwear Pro ‘Coral Beat’
- Leichner Nail Gloss ‘Blueberry’
What do you think? Which five chocolate bars would you include in this design?
The Last Rolo…
The Last Rolo is where I hand over the last few words of each Chocolate Treat Week blog post to another blogger. In the run up to Chocolate Treat Week I asked five of my favourite bloggers a couple of questions about their favourite chocolate treats, and today’s answers come from Ra of RaRa Reid.
Can you recommend any chocolate scented, flavoured or themed beauty/fashion products?
I would recommend the Soft Coeur masage bar from Lush. It smells incredible and is amazing for your skin. Like most Lush products! It’s also heart-shaped which I love.  Lush also have a lip tint called Double Choc. I haven’t actually tried this as brown shades don’t suit me, but it just smells wonderful! As for fashion, I am a huge fan of kitsch jewellery, especially necklaces. I got a Jammie Dodger necklace a while back from Diamond Lil’s and they have a lovely Bourbon Biscuit necklace which I’d also love to add to my jewellery collection.
  This is their website. There are plenty of other sites that have similar necklaces to this too.
What is your favourite chocolate treat to eat, and why?
Choosing a favourite chocolate treat is really quite difficult, I love all chocolate!  My absolute favourite has to be a Kit Kat Chunky Peanut Butter, I haven’t actually had one for over 2 years now though as Teddi is allergic to nuts. Other than that, I love all the chocolates that I used to have as a child. Like Freddos and Curly Wurlys.
Once again, thank you so much for reading my latest Chocolate Treat Week post. Please come back tomorrow to read the final chocolate themed post which will focus on fashion and accessories.
Naomi x
Share this:
£100 Asos Blogger Challenge: Summer Gothic
8To celebrate reaching (nearly) 1000 followers on Twitter, The Discount Coder Blog is running a giveaway, and to enter, you must complete the £100 Asos Blogger Challenge! So, today, I will be sharing my entry  The rules of the challenge are as follows…
- Head over to ASOS.com
- Put together the hottest outfit you can for £100 or less (no student discount or Asos discount codes allowed)
- Blog about your stylish ensemble over on your blog
- Leave a comment below with a link to your post
I spent a good while over a couple of days browsing Asos for the ideal outfit for my entry. I wanted to put together a fairly basic but daring outfit that I would wear myself and would be great for summer, and this is what I came up with: Summer Gothic! The picture is clickable if you want to see it in more detail.

My starting point for this challenge was the main outfit. I love dresses and I love black, so it seemed only natural to look for something along those lines. I thought a sleeveless maxi was the way to go for a summer look, so when I saw this Maxi Dress with Dipped Hem I was sold. Dipped hems are very trendy at the minute and I like the floaty look they give. In my teenage Goth days I wore a lot of long flowy clothes so I think this is very suitable as a starting point for Summer Gothic!
My next choice was the shoes… I was hoping to find a pair of big, black, stompy boots within my £100 budget but unfortunately that didn’t happen, so I went for my second choice – a pair of heeled TERI Platform Chelsea Show Boots to give the look a more elegant feel, whilst remaining edgy. I mean, who doesn’t feel edgy in heels? The platform makes them look quite chunky too which is what I was after.
Accessories wise I wanted to keep it simple but make a statement. I thought skulls were ideal for the Gothic look, and when I came across the Skull and Floral Scarf I couldn’t believe how perfect it was! I really, really want to buy it for myself – the print is stunning and it would add layers and depth to the simple dress. I wanted something chunky but interesting for the wrists which is why I chose the River Island Bracelet Pack. The skull detail matches the scarf really well and the different beads and materials add texture to the outfit. The bracelets were in the men’s section of the Asos website, but who says women can’t wear ‘men’s’ clothes and accessories?
We all know an outfit isn’t complete without the right make up, so to match this simple Summer Gothic outfit, a simple Gothic make up look is needed. Heavy make up in summer is a no-no, so I think classic red lips and nails, and smokey black eyes are all that’s needed! Illamasqua’s branding screams classy and Gothic, which is why I chose Illamasqua SS12 Human Fundamentalism Lipstick in ‘Liable’, a beautiful bright red. For strikingly bold, black eyes, Barry M Supersoft Eye Crayon is ideal, and to add an extra splash of colour I added Rimmel London I Love Lasting Finish Nail Polish in ‘Double Decker Red’ to the mix.
The total cost of this outfit is £98.49, so you’d even come away with enough change for an ice cream – the summery icing on the fashionable cake!
Naomi x
Share this:
Nail Art Tutorial: Rainbow Stripes
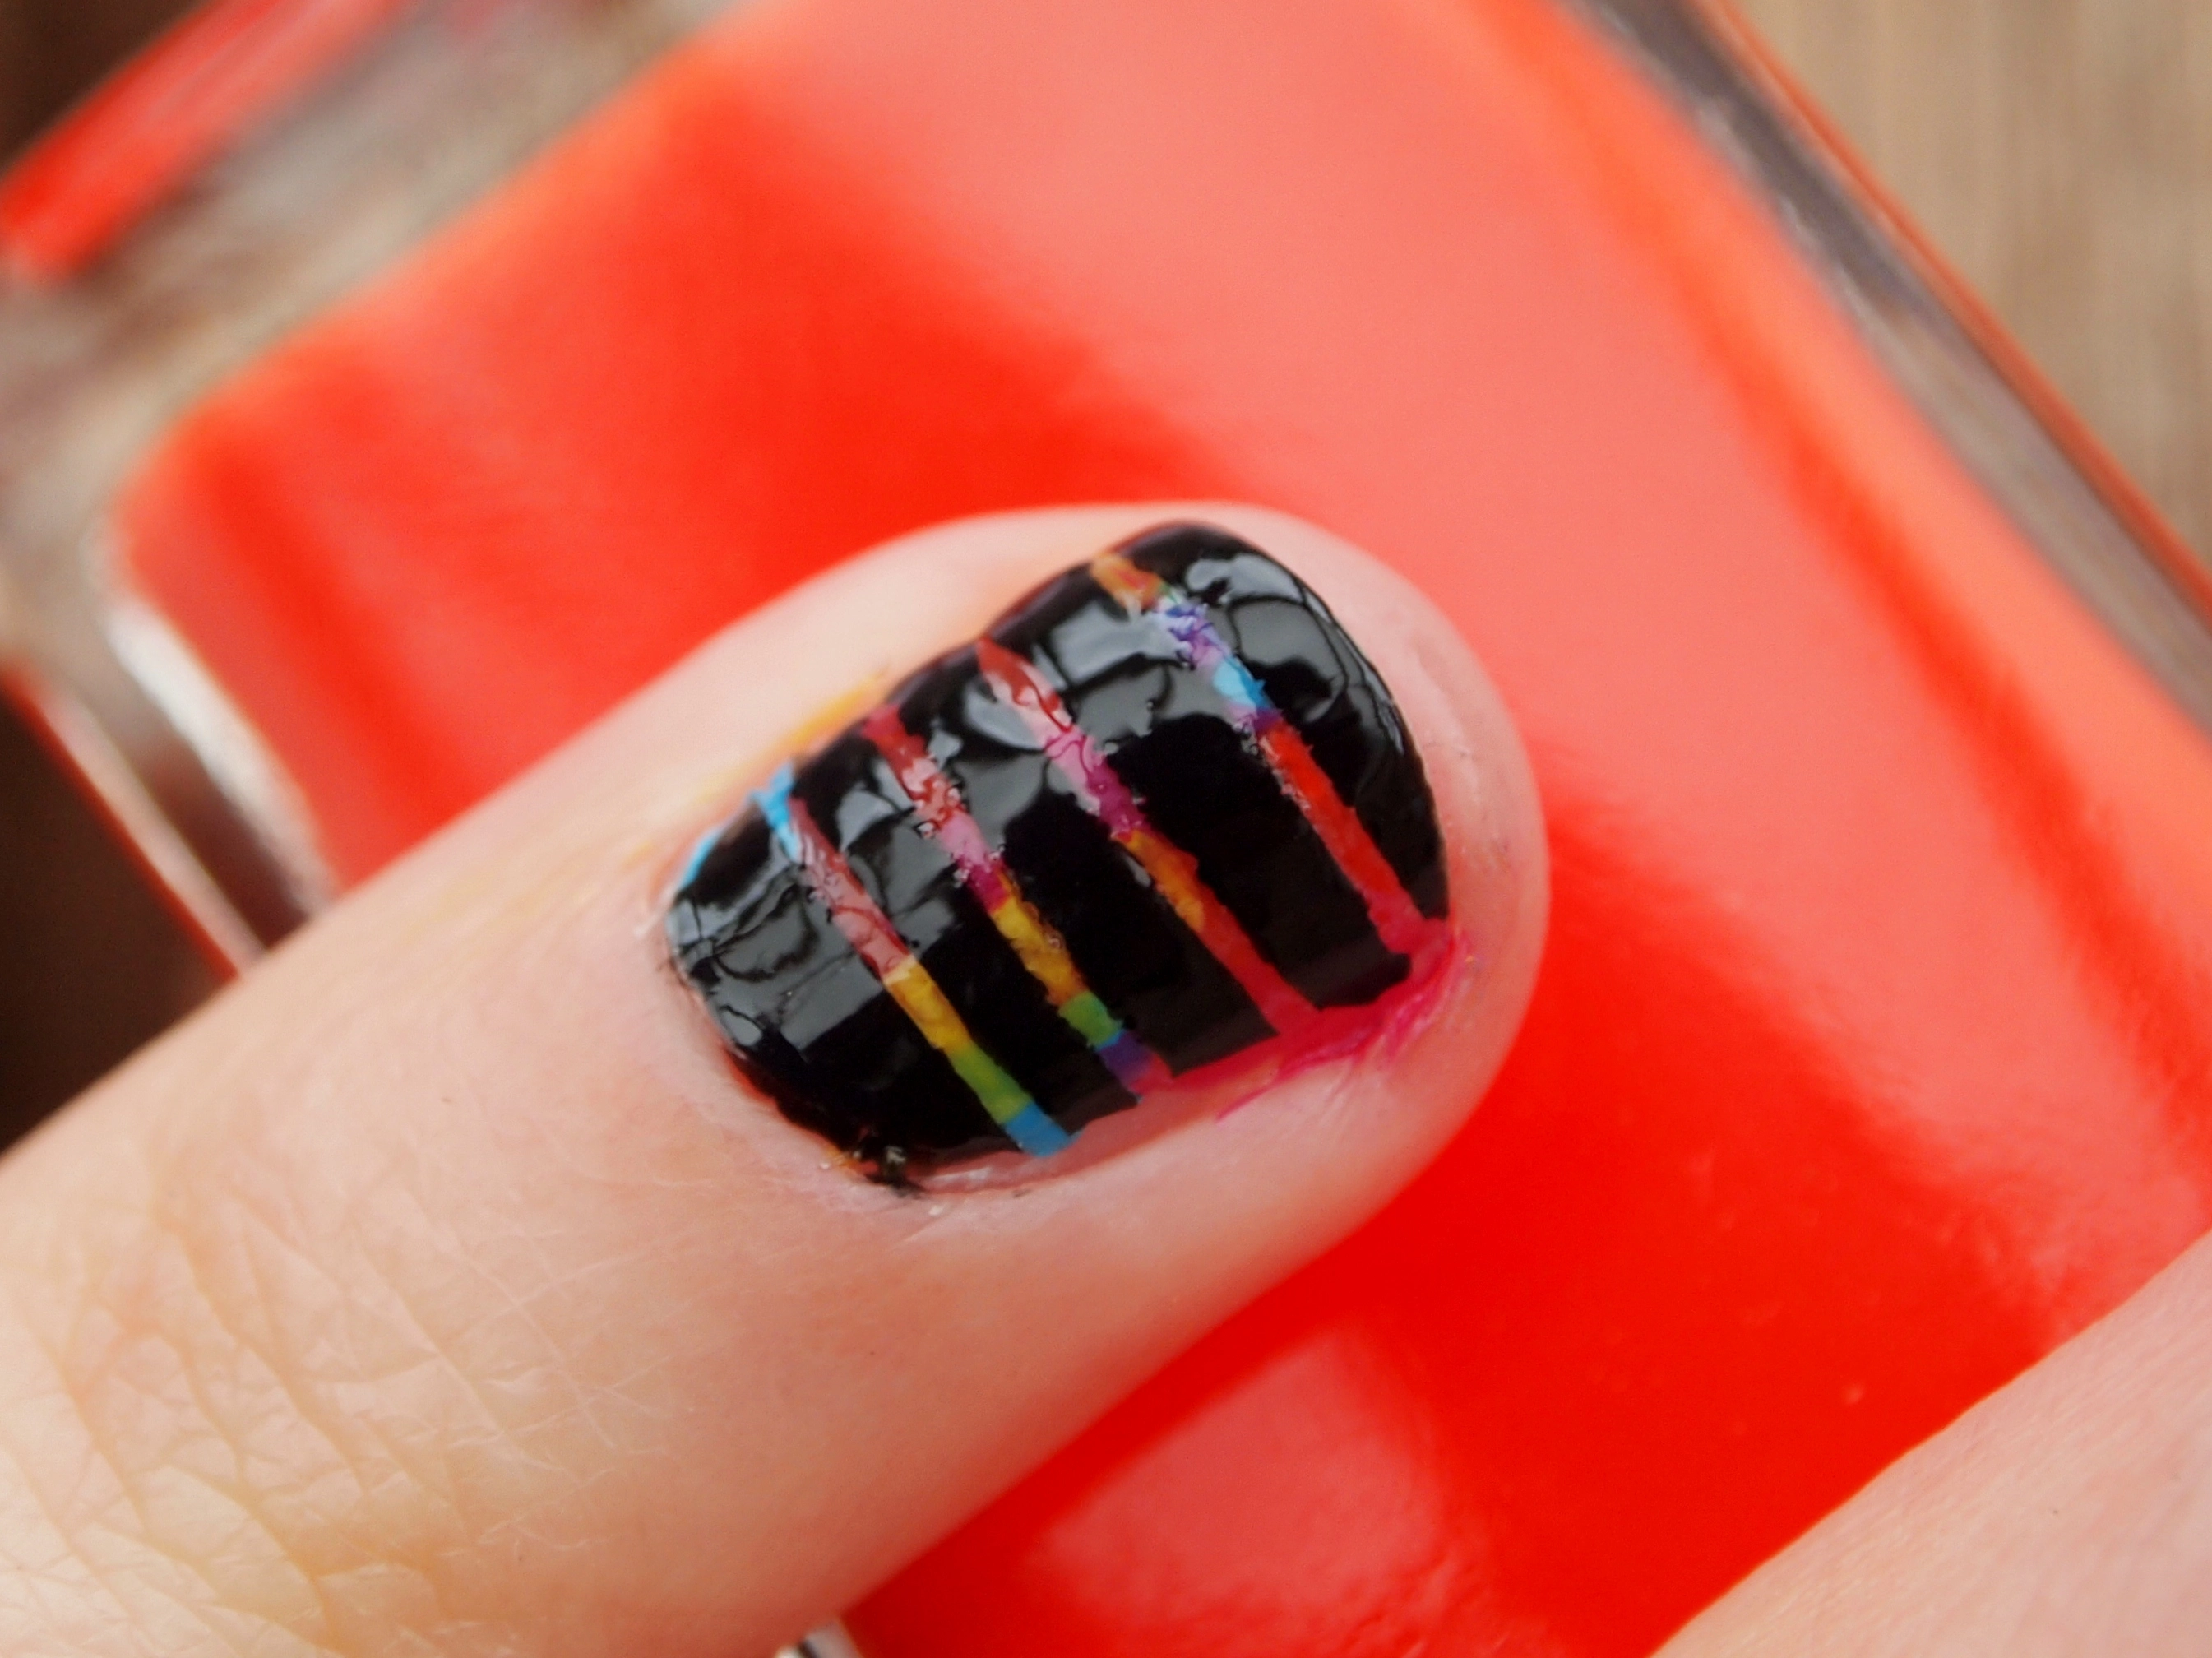
16A little while ago I bought some striping tape from eBay and I created a sporty look to celebrate my favourite rugby team reaching the premiership final. I promised that I would put together some tips on how to use striping tape, so today I thought I’d do my first tape tutorial! These rainbow stripes don’t use striping tape in the most conventional way, but it still looks really great. The white pattern on my nail in the photo below is just a reflection, in case you were wondering 
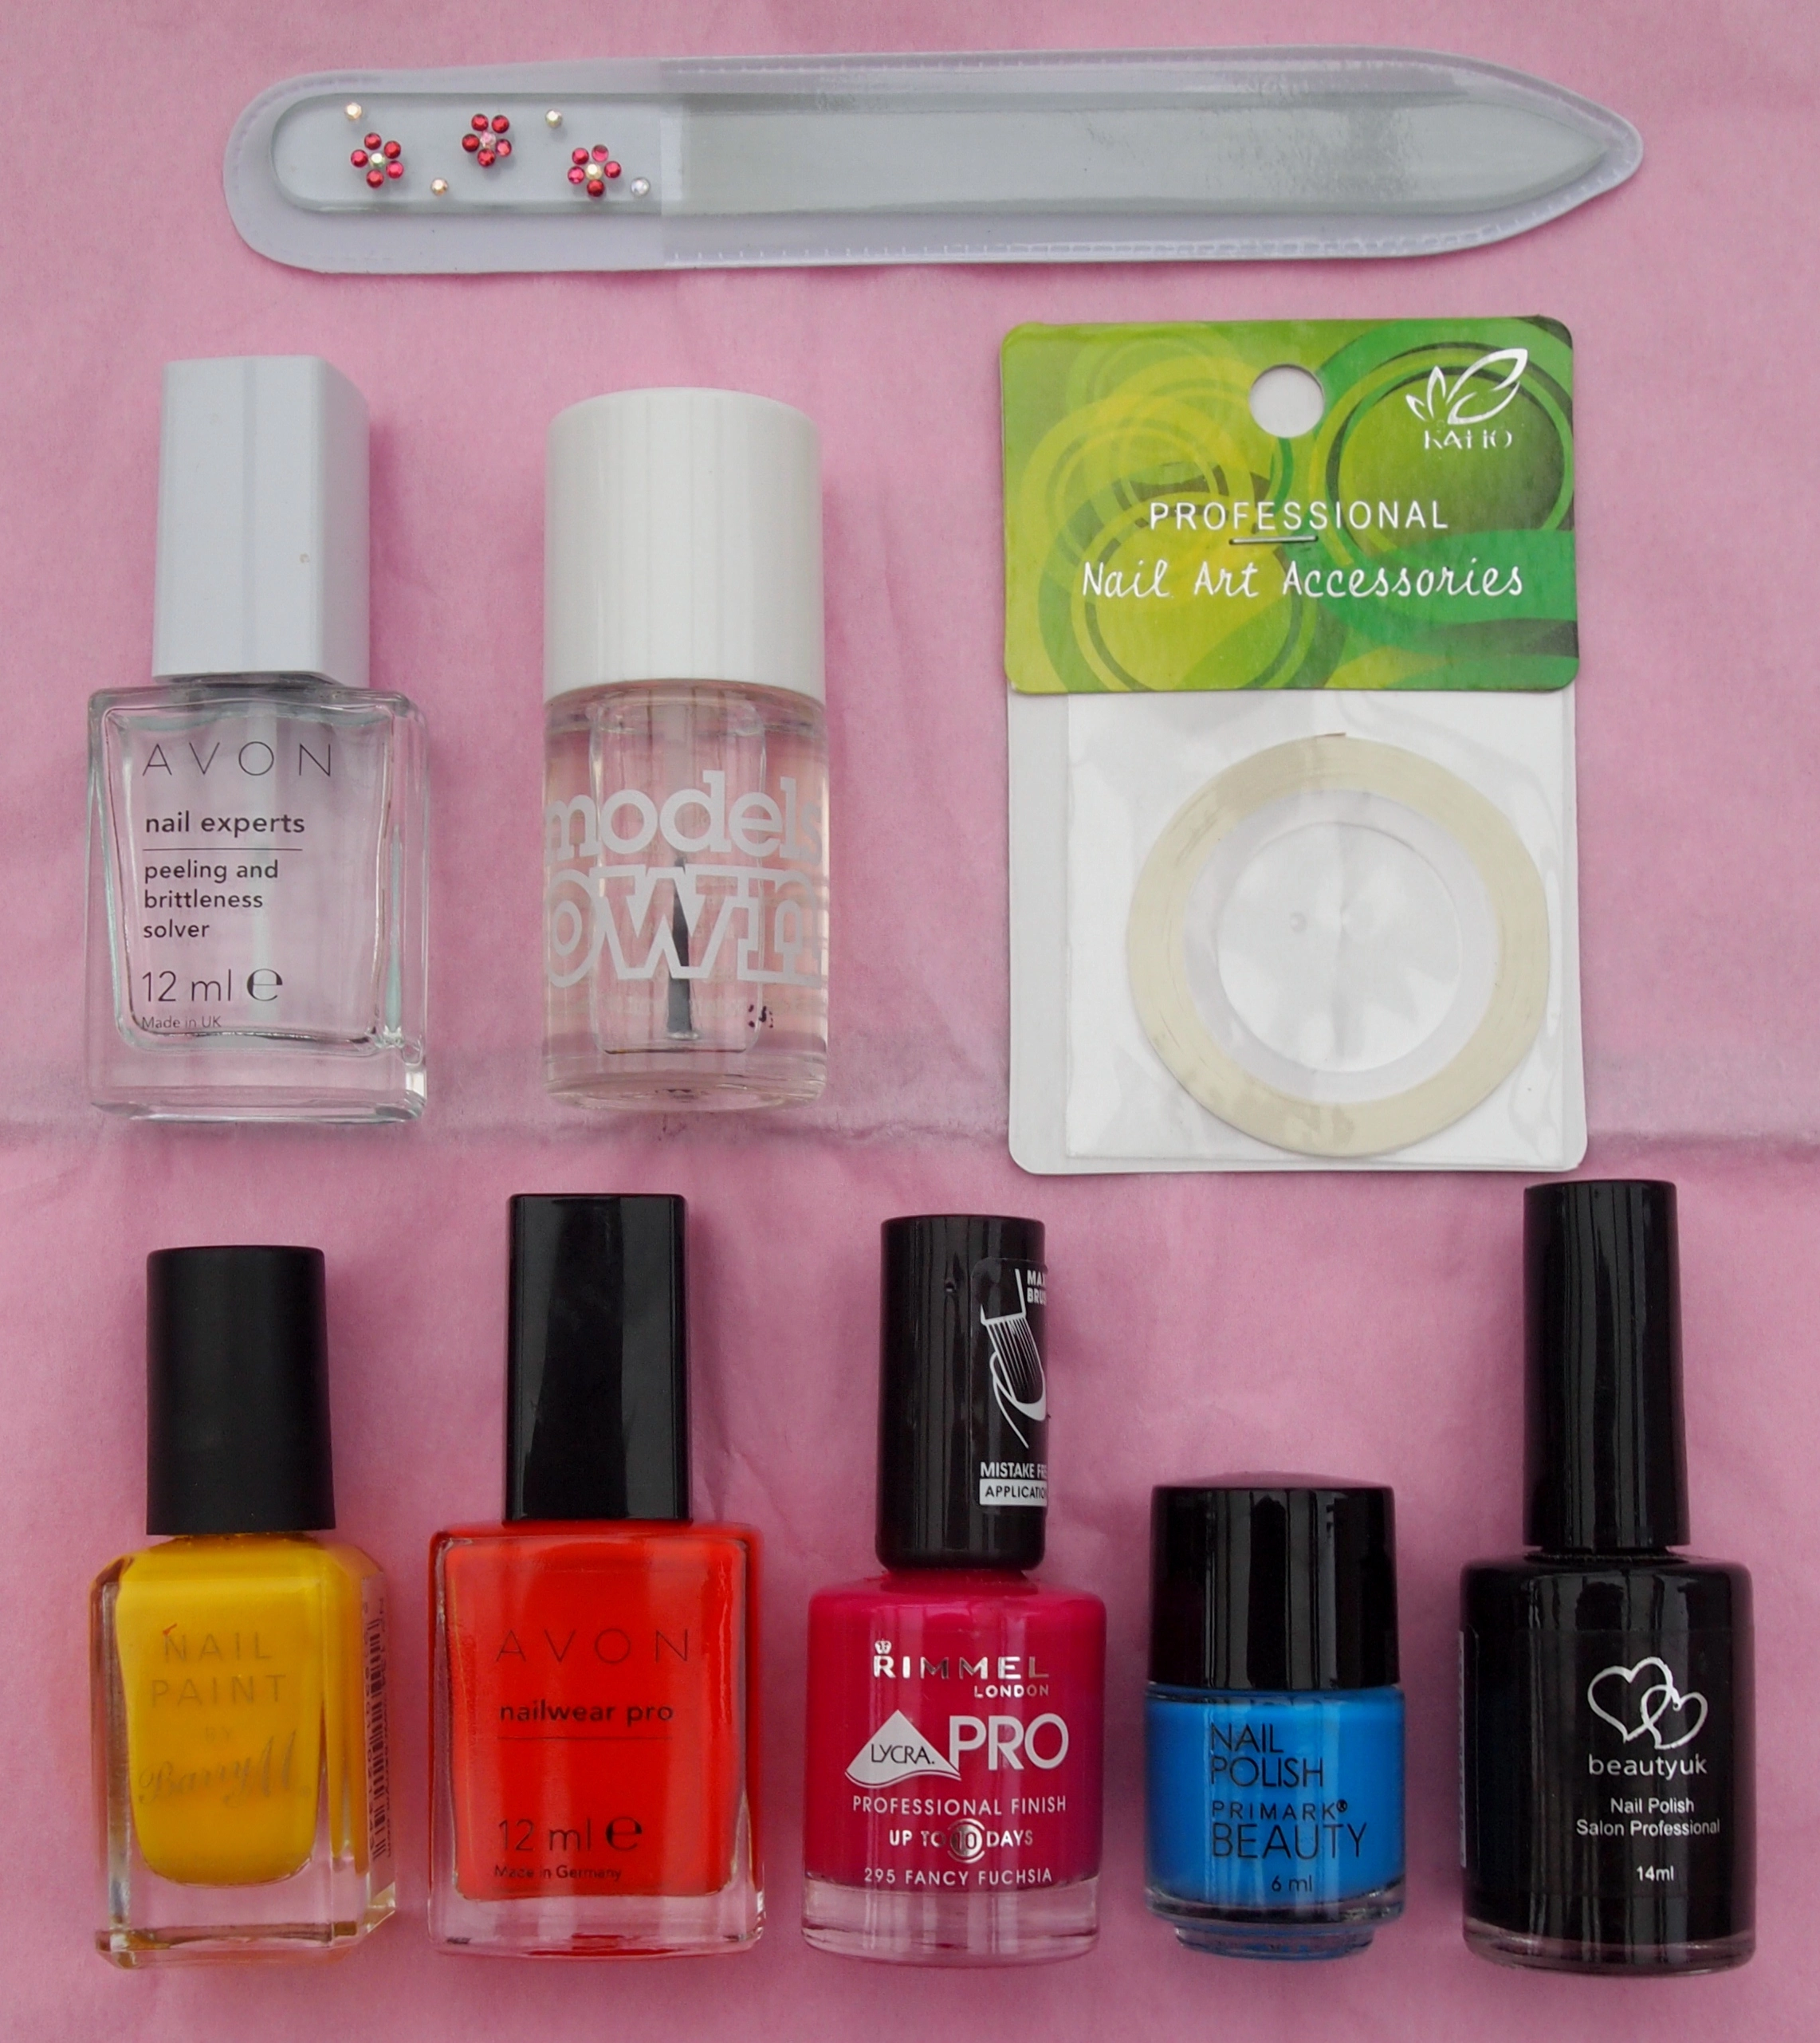
To create this look, you will need the following…
- A nail file.
- A base coat and a top coat.
- Plain striping tape.
- 3 or 4 bright coloured varnishes.
- Black nail varnish.
And this is how you do it…
STEP ONE
As with any manicure, the first step is to moisturise your hands, clean and shape your nails (and buff if you like) and apply a base coat, just to make sure your nails stay healthy and don’t stain!
STEP TWO
Prepare your striping tape! Some people like to cut the striping tape when they need it by placing it on their nails whilst still on the roll and then snipping it, but I find that too bulky so I always cut it first. Decide how many stripes you want on each nail and then cut enough strips. I went for four on each. Make sure you cut them longer than the width of your nail so you can peel them off easily. Also, it’s best not to pull the tape too hard or it will stretch/curl.
STEP THREE
To create the rainbow base, you need to paint blobs of the different coloured varnishes onto your feature nails. I chose orange, yellow, pink and blue, as layering the blue and yellow gives green and layering the pink and blue gives purple. Extra colours without the effort! Ensure that every bit of your nail is covered so there will be no bare bits in the finished look.
STEP FOUR
When your nails are dry, place the striping tape over your coloured nails, evenly spaced, and press it down edge to edge so there are no gaps underneath. Make sure the varnish is completely dry, and not tacky, or the tape will pull the colour off when you peel it back. Also, it is best to press the excess onto your skin to keep it out of the way.
STEP FIVE
Paint all of your nails black – simple as that! Just be careful when painting the taped nails so you don’t accidentally lift the tape up  Try to apply one opaque layer of black, rather than a few thinner ones, or it will be too thick and ridged when you peel the tape off.
STEP SIX
This is the final step! When the black varnish is completely dry and not tacky, peel the tape off very carefully to reveal the rainbow stripes underneath, then apply a top coat. Again, the wobbly bits on my nails in the picture are reflections, not mistakes 
And there you have it – pretty rainbow stripes in minutes. What do you think?
Naomi x
Share this:
MUA Eye Dust in ‘Shade 2′
4This morning it occurred to me that I haven’t done a straight up make up review in a while, which isn’t on really considering this is a beauty blog, so today I thought I’d post my thoughts on one of my latest make up buys – MUA’s Eye Dust in Shade 2.
All of MUA’s Eye Dusts come in classy little 1.5g pots, which are conveniently shaped so that you don’t make much mess when dipping your brush into the dust, as you can see below!
Despite being a Barry M fan, I’ve never been too keen on eye dusts in the past. In fact, other than this one, the only one I have is the BM Beauty one that I got in my February Glossybox, and I wasn’t too impressed with that in the end. Still, MUA have never let me down so far, so I kept an open mind with this one.
My first thought when applying this was “WOW the brush picks it up well!”, and here is the evidence…
One little dip and there was enough dust to decorate a Christmas tree! I tried to remove the excess by tapping it on the side of the hole in the pot, but as the pot is so full is just picked up more, so I ended up gently blowing it away, which is a bit of a waste really. I need to improve my dust collecting technique I think! The dust itself is quite light too so has the tendency to go all over everywhere if you have too much on the brush, but that’s easily removed from your skin with a clean brush.
Once I had an appropriate amount of dust on the brush, I applied the dust like an eye shadow. The pigmentation in this product is truly amazing. One dusting was enough for a bold look, and it was easy to pack on and build up into something even more outstanding! The picture below was taken after just one coat so you can see how heavily pigmented and bright it is…
Pretty, right?
Now, I know I’m predictable in my colour choices, but I think this kind of purple blue works well with my pale skin tone. In the pot this eye dust looks like a fairly tame mauve shade, but don’t be fooled! Shade 2 is actually a vibrant violet with a blue iridescence to it which looks absolutely beautiful in the right light.
After trying MUA’s Eye Dust I think I’m an eye dust convert! It’s a great product to use if you want to create a quick eye-catching look that will last, without having to put in too much effort! It’s a look that can be worn day AND night too, so you can easily just top it up before you go out – fantastic!
Have you tried MUA’s Eye Dusts? If you want to invest, they’re a bargainous £1 each in most Superdrug stores, or they can be bought online via the MUA Store!
Naomi x
Share this:
NOTD: Easter Brights!
5Happy Easter everyone! I hope you’re all having a nice day and enjoying your chocolate eggs  Despite the grey skies and cold showers, I thought I’d try and brighten up this Spring celebration with some Easter Bright nails.
The varnishes I used were:
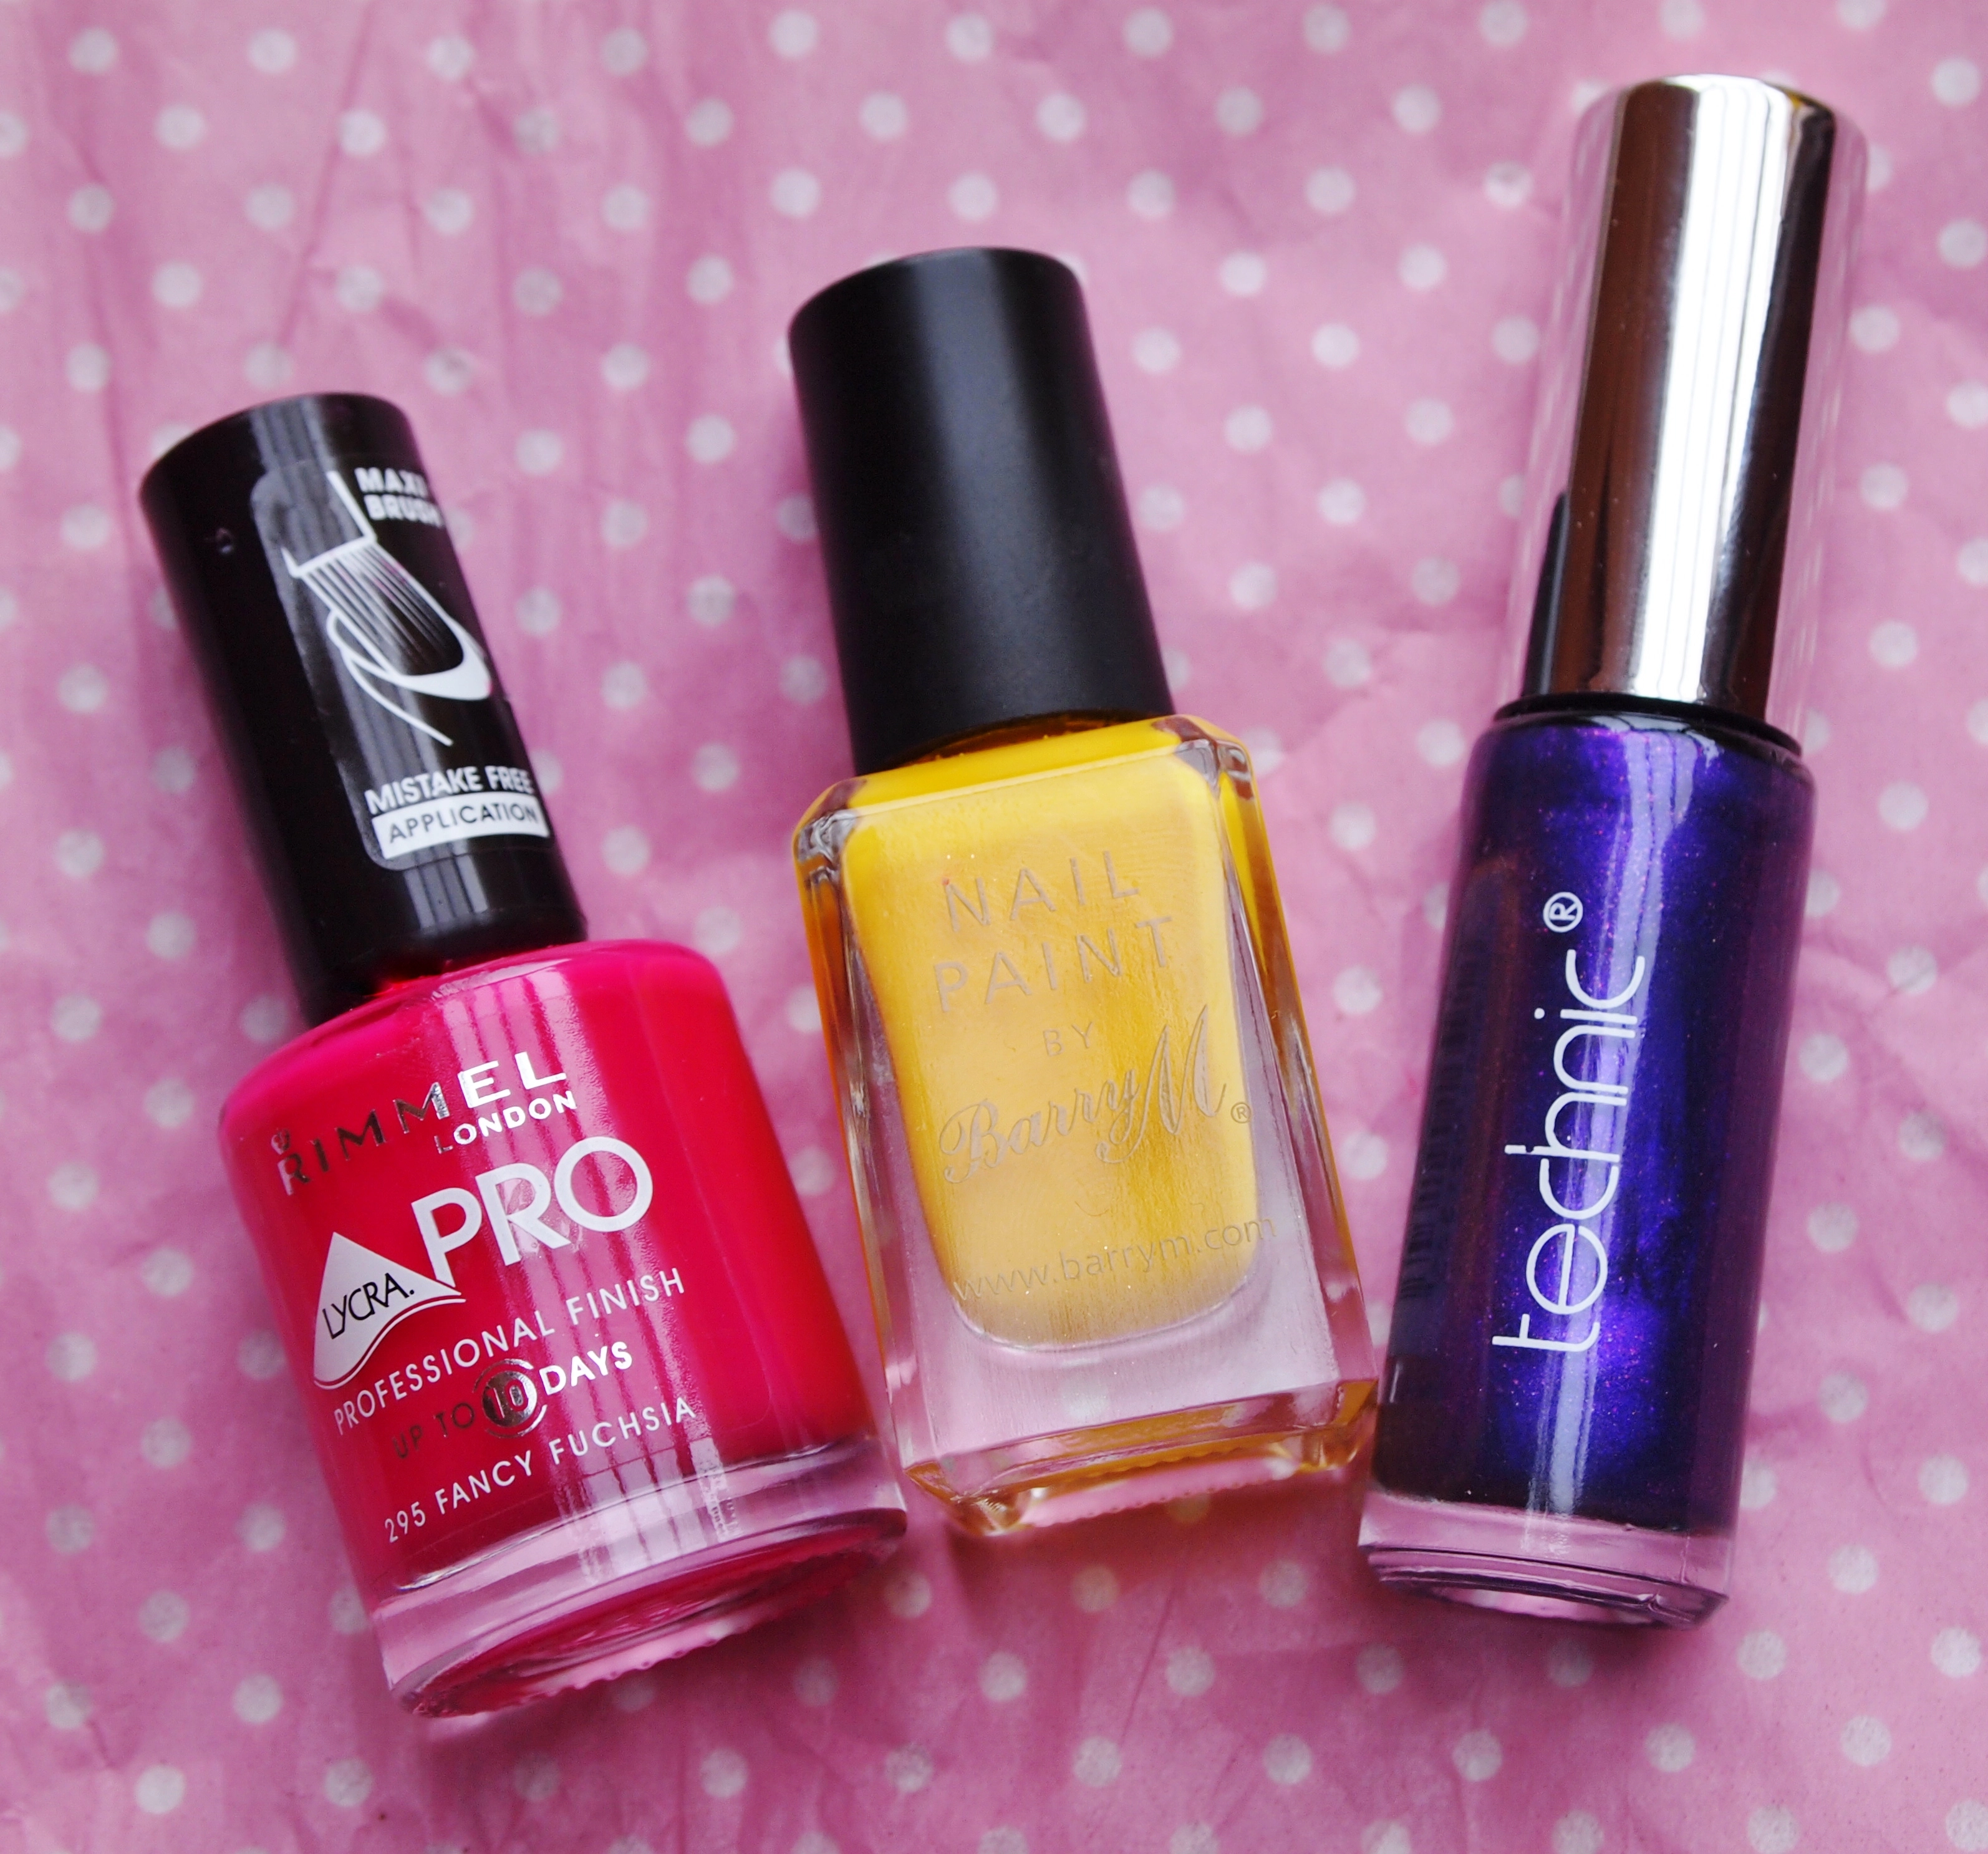
- Rimmel Lycra Pro Professional Finish in ‘265 Fancy Fuchsia’
- Barry M Nail Paint in ‘134’
- Technic Purple Nail Art Pen
This was the final result!
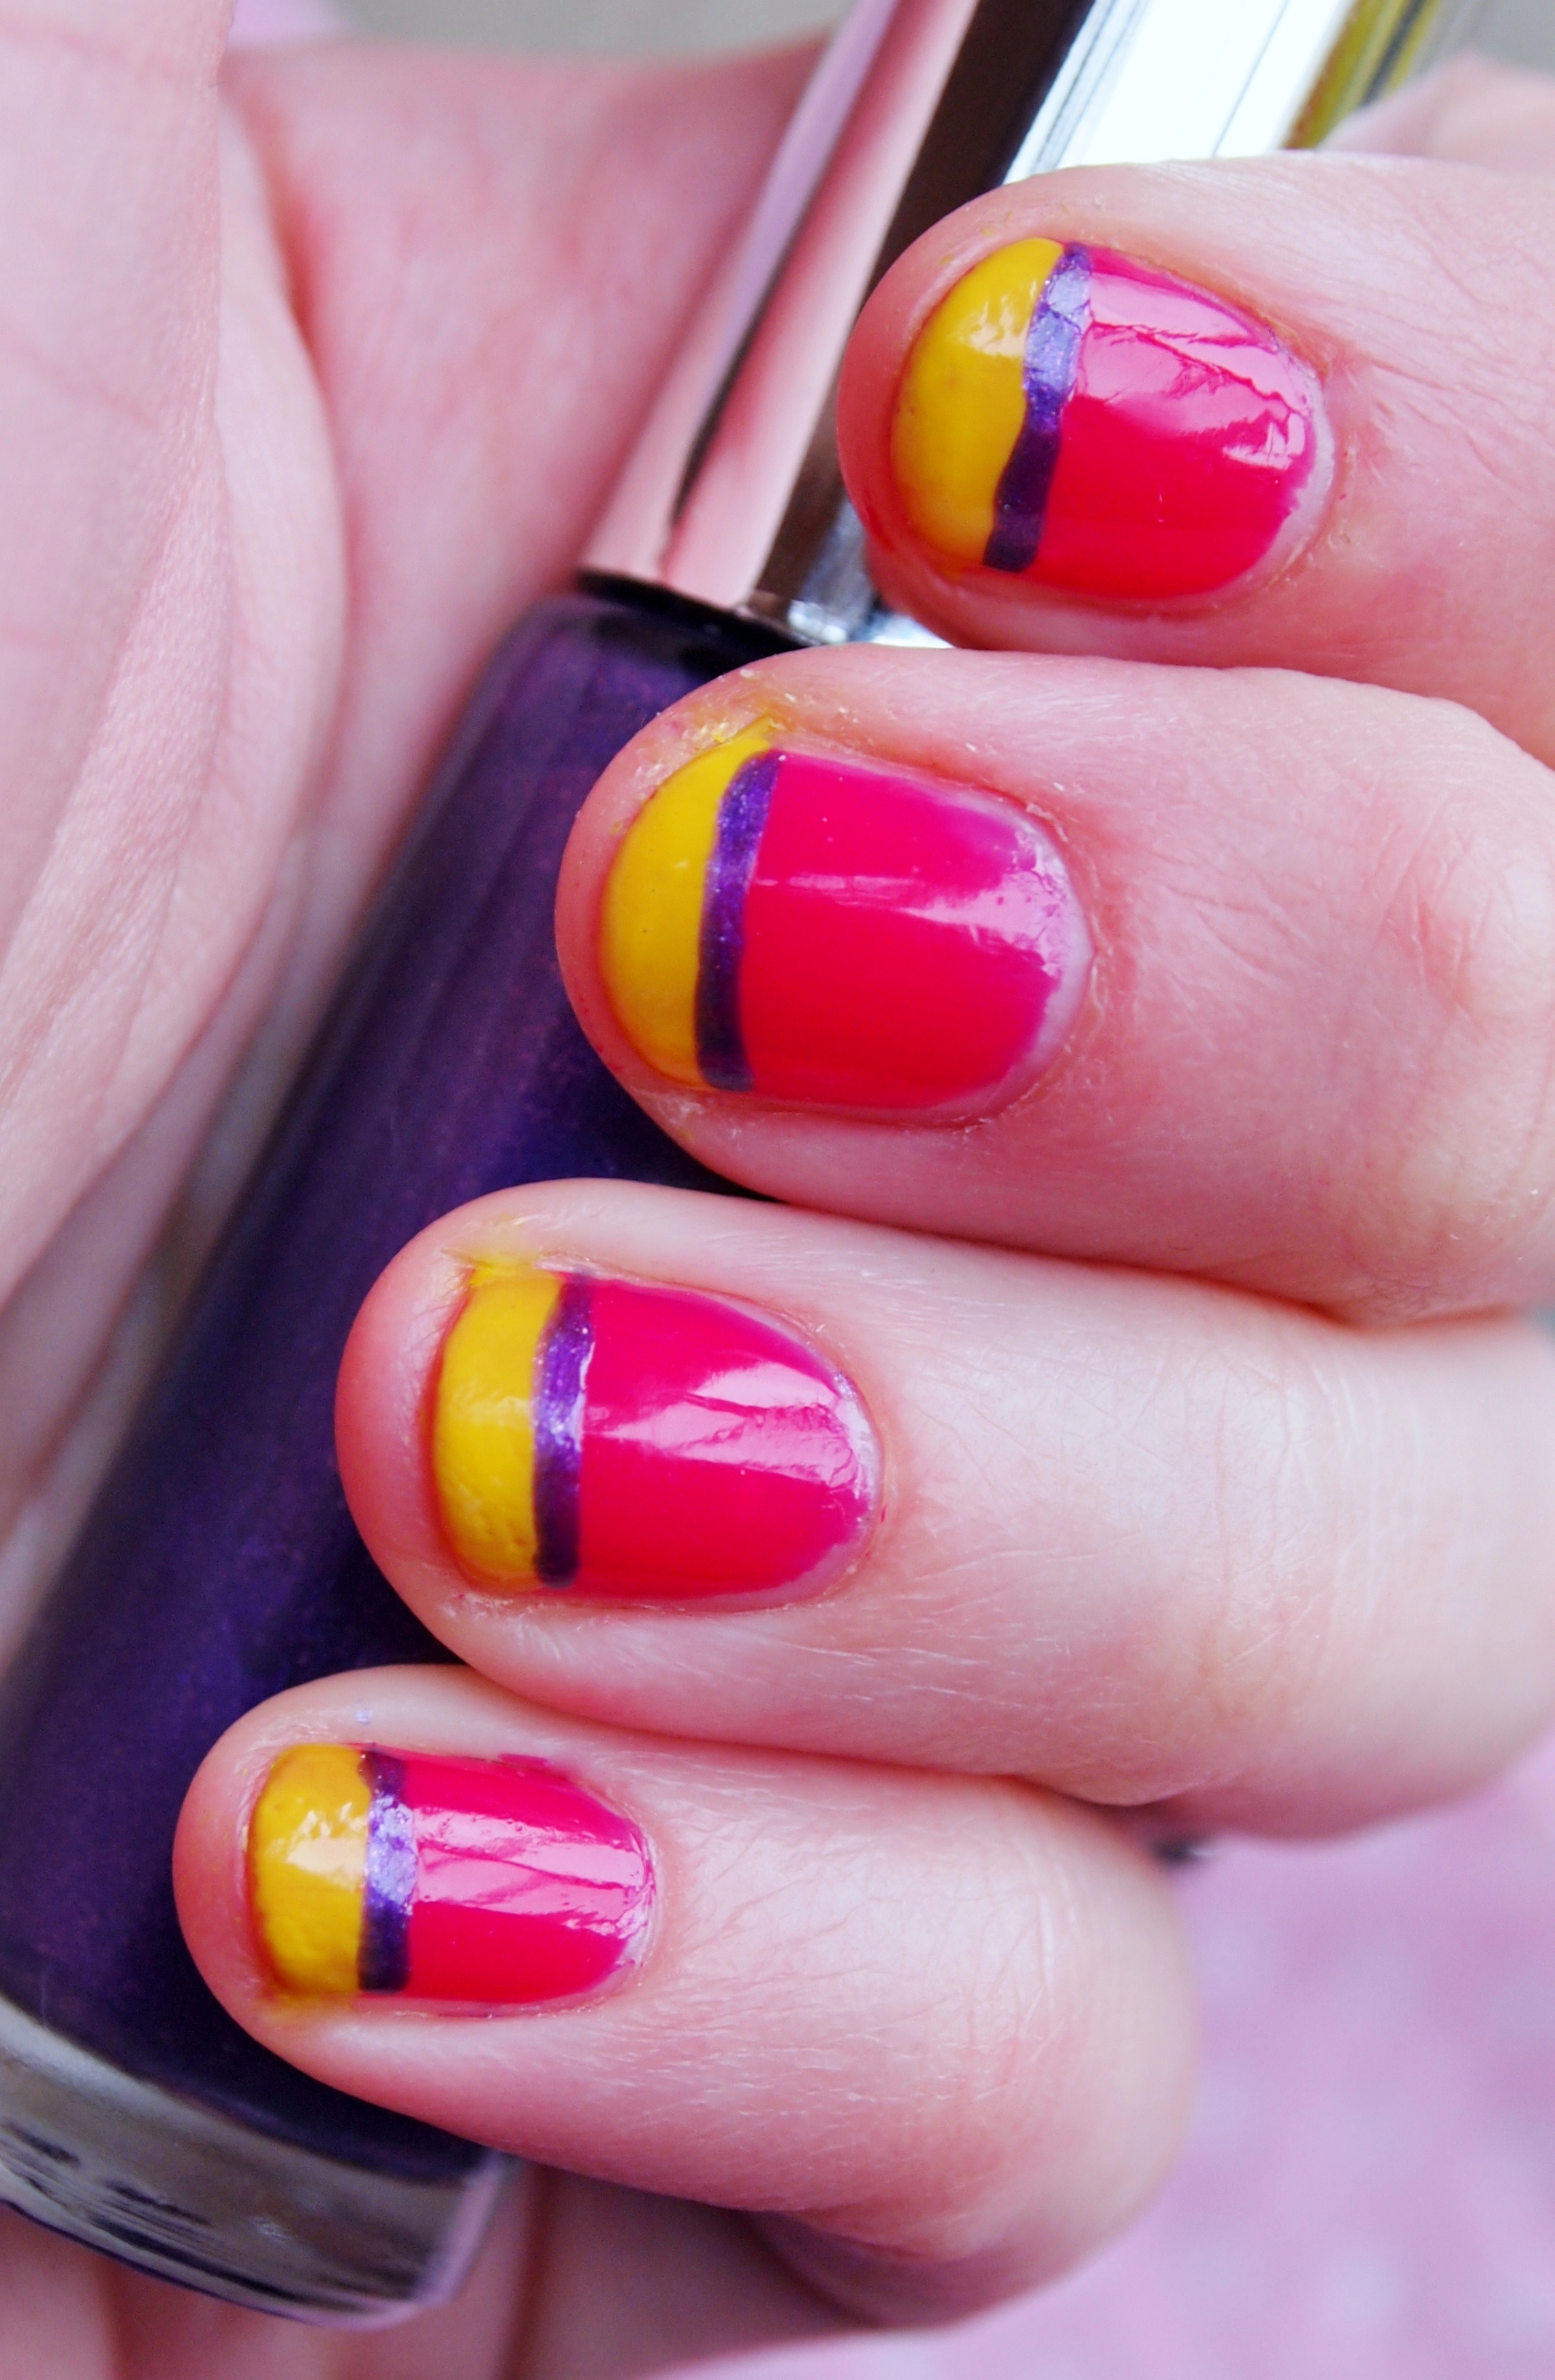
I painted the tips and purple line freehand, with no guides, on top of the pink and finished with a clear top coat. I’m pretty pleased with how they turned out as I don’t have the steadiest of hands!
Rimmel’s Fancy Fuchsia is a favourite of mine as it has a wide brush so applies perfectly evenly and dries quickly. It’s such a stunning shade of pink as well – bold without being garish.
The Barry M yellow was gifted to me recently and I really like it. I usually steer clear of yellow polishes as I worry they make your nails look stained rather than painted, but this shade is so striking it looks nothing but lovely.
The Technic Nail Art Pen was an eBay bargain at £1.99. It is actually a very, very fine brush rather than a pen but it is just as easy to control once you get the hang of it.
What do you think? I’d love to see your Easter themed nails too!
Naomi x
Share this:
Barry M Nail Paint in 303 Bright Purple
8Let me just start by saying I AM SO EXCITED ABOUT THIS NAIL PAINT!
Barry M Nail Paint in 303 Bright Purple
I love nail varnish, I love brights and I love purple, so it seemed only natural to try this bargainous £2.99 nail paint by Barry M and I wasn’t disappointed! The varnish applies like a dream – it glides on effortlessly as the longer lid is easy to handle. After two coats, the coverage is perfectly even and bold, with no streaks at all. I absolutely adore the vibrant shade; it’s a pinky purple that reminds me of rich plums and it has a fantastic jelly finish that really stands out.
These swatches were photographed in daylight without a flash and the pink hues really pop, but inside the house the varnish looks a deeper shade of violet which is just as gorgeous.
My only quibble is that I had to wait a while for the varnish to dry fully. It stayed tacky for a good 5 minutes until I added a clear top coat which dried quickly, but it was well worth the wait. I really can’t get enough of this nail paint and I hope to try more Barry M colours in the not too distant future, so if you’re a Barry M fan please keep checking back!
Naomi x


